Showing Posts From
Branding
 CreatorPlaybook Team
- 30 Oct, 2026
YouTube Verification Explained: Phone Verification, Advanced Features, and the Grey Badge
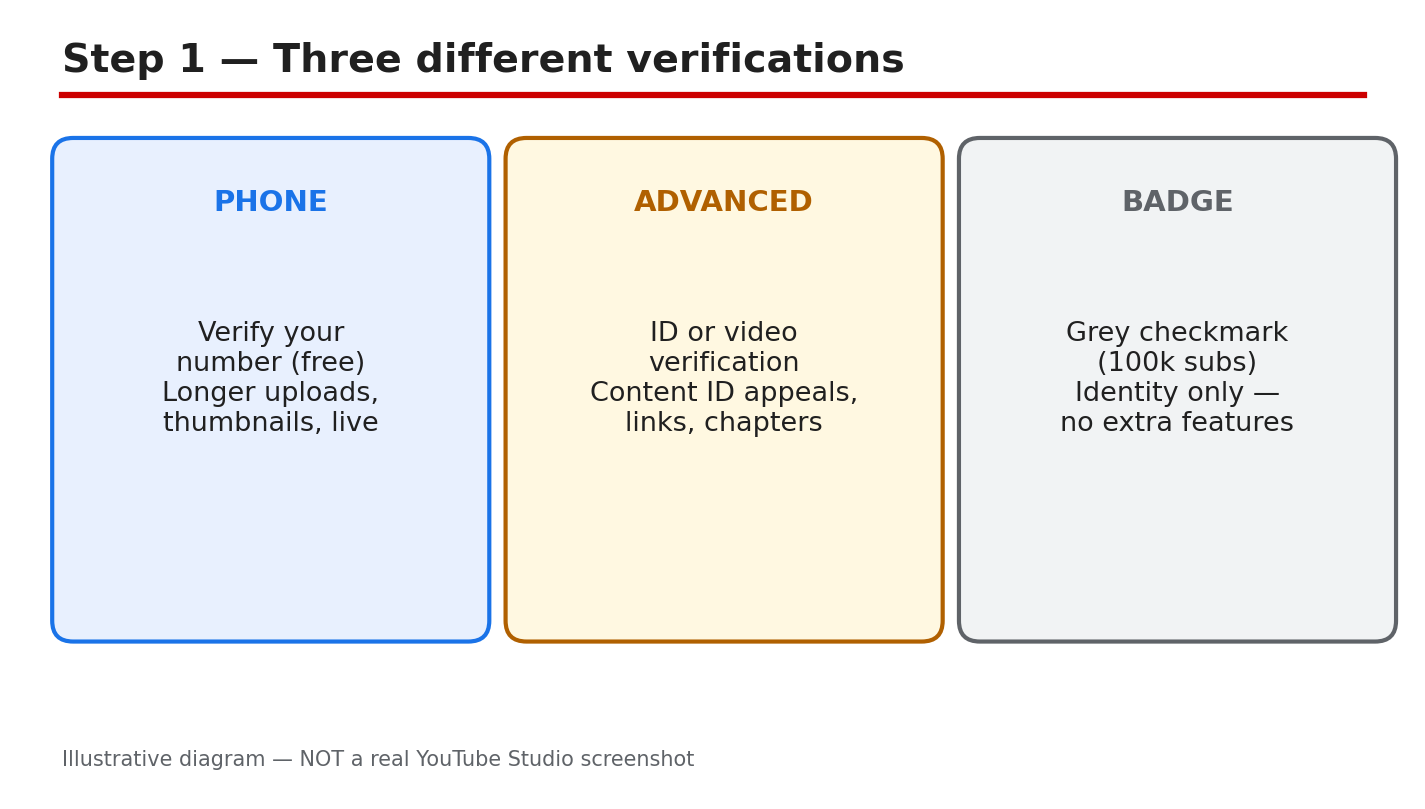
Three different things on YouTube all use the word verification, and mixing them up wastes hours. Phone verification unlocks longer uploads, custom thumbnails, and live streaming. Advanced features unlock Content ID appeals, links in descriptions, and chapters. The grey badge only proves a channel is the real one, and it needs 100,000 subscribers. This guide separates the three, shows you exactly where to check each one in YouTube Studio, and walks you through the steps to apply, recover lost access, and avoid the scams that charge for a free badge. What You Will LearnHow phone verification, advanced features, and the grey badge differ. Where to check your status in Studio in under a minute. The exact rules for the grey badge, as YouTube Help states them. What to fix before you apply, so you are not rejected. How to recover advanced features if you lose them. Why no one can sell you a badge, and what to do instead.Step 1: Learn the Three Different Verifications Phone verification is free and proves you are a real person. You enter a phone number, YouTube sends a code by text or voice call, and you enter it back. Once verified, you can upload videos longer than 15 minutes, add custom thumbnails, live stream, and appeal copyright claims. Advanced features are the next level: after phone verification, you unlock them by verifying with an ID or a video, or by building up channel history. They add Content ID appeals, links in video descriptions, and chapters. The grey badge is different again: it is a check mark next to your channel name that proves you are the real creator, and it gives you no extra features at all. Example: a new creator phone-verifies on day one and can live stream the same week, but the grey badge stays out of reach until 100,000 subscribers. Common mistake: paying a stranger who promises a grey badge. Applications are free inside YouTube Studio, and no one outside YouTube can grant one. Figure 1: Illustrative diagram comparing the three verifications: phone, advanced features, and the grey badge. This is a mock-up, not a real YouTube Studio screenshot. Step 2: Check Your Status in YouTube Studio Sign in to YouTube Studio on your computer, then go to Settings, then Channel, then Feature eligibility. That page shows three groups: standard features, intermediate features, and advanced features, with your current status for each. For the grey badge, the path is different: go to Settings, then Channel, then Verified badge, and you will see Apply only if you are eligible. If the Verified badge tab does not appear, YouTube says you are not yet eligible to apply. Example: you open Feature eligibility and see advanced features marked as not available, with a button to verify with an ID or a video. Common mistake: asking a manager or editor to complete phone verification for you. YouTube Help says that for a channel without a brand account, only the channel owner can phone-verify it, so the owner must do this step personally. Figure 2: Illustrative diagram of the Studio path: Settings, Channel, Feature eligibility, and the Verified badge tab. This is a mock-up, not a real YouTube Studio screenshot. Step 3: Know the Grey Badge Rules YouTube Help lists three requirements to submit a request for channel verification. You must have 100,000 subscribers. Your Google account must have 2-step verification turned on. And you must have a complete profile, including a banner image, profile picture, description, and at least one public video. Only the channel owners or the managers of a channel can submit the application. There is no workaround at the standard tier: a smaller channel cannot buy, request, or unlock the badge early, although YouTube says it sometimes proactively verifies well-known channels with fewer than 100,000 subscribers. Example: a channel with 120,000 subscribers but no 2-step verification will see a prompt to turn it on instead of an Apply button. Common mistake: changing your channel name after getting verified. YouTube says a verified channel stays verified unless you change your channel name, which removes the badge. Changing your handle, on the other hand, does not remove it. Figure 3: Illustrative diagram of the grey badge rules: 100,000 subscribers, 2-step verification, and a complete profile. This is a mock-up, not a real YouTube Studio screenshot. Step 4: Get Ready Before You Apply Work through four checks before you open the application. First, confirm your subscriber count is at or above 100,000, and remember that YouTube's systems can take a few days to update after you pass the mark. Second, turn on 2-step verification on the Google account that owns the channel. Third, complete your profile: banner image, profile picture, description, and at least one public video. Fourth, check for active strikes, because YouTube reserves the right to revoke verification from channels that violate its Community Guidelines or Terms of Service. Example: you reach 100,000 subscribers on Monday, turn on 2-step verification on Tuesday, and the Apply button appears later that week. Common mistake: applying with an incomplete profile and getting stuck, then assuming the system is broken. Fix the missing piece first, then apply, and keep your record clean while you wait. Figure 4: Illustrative diagram of the pre-application checks: subscribers, 2-step verification, profile, and strikes. This is a mock-up, not a real YouTube Studio screenshot. Step 5: Recover Advanced Features You Lost If advanced features stop working, start with the simplest fix: verify your phone number again in Studio under Settings, then Channel, then Feature eligibility. If that does not restore access, YouTube offers two routes to advanced features: verification using an ID or a video, or building up sufficient channel history. Reported guidance puts ID or video verification review at about 24 hours, and channel history at about two months of clean activity. Treat both figures as reported estimates, not promises, and keep uploading normally while you wait. Example: a channel loses advanced features after a long break, re-verifies its phone number, and the features return the same day. Common mistake: paying a service that claims it can restore advanced access overnight. No service can do that for you, and sharing your account details with one can put the whole channel at risk. Figure 5: Illustrative diagram of the recovery routes: re-verify by phone, ID or video check, or channel history. This is a mock-up, not a real YouTube Studio screenshot. Step 6: Follow a Simple Verification Plan Do the steps in this order. Phone-verify your channel first, because every other step needs it. Then unlock advanced features with an ID or video check, or by building channel history. Grow your channel with regular uploads until you pass 100,000 subscribers, keep 2-step verification on, and keep your profile complete. When the Apply button appears under Settings, then Channel, then Verified badge, apply from inside Studio. The application is free, and anyone asking you to pay for a badge is running a scam. Example: a creator phone-verifies in week one, unlocks advanced features in month two, and applies for the badge the week the channel passes 100,000 subscribers. Common mistake: treating the grey badge as a goal that unlocks features. It does not. Phone verification and advanced features are what change what your channel can do. Figure 6: Illustrative diagram of the verification plan: phone first, advanced next, badge last. This is a mock-up, not a real YouTube Studio screenshot. Quick ChecklistPhone-verified the channel with the owner's phone number. Checked Feature eligibility in Studio for all three feature levels. Know which of the three verifications you still need. Turned on 2-step verification on the channel owner's Google account. Completed the profile: banner, picture, description, and one public video. Never paid anyone for a badge or for advanced access.Frequently Asked Questions Is phone verification the same as the grey badge? No. Phone verification is a free code check that unlocks longer uploads, thumbnails, live streaming, and copyright appeals. The grey badge only proves a channel is the real one, and it needs 100,000 subscribers. Who can phone-verify a channel? YouTube Help says that for a channel without a brand account, only the channel owner can phone-verify it. For a brand account channel, the owner and managers can do it. Does the grey badge give me extra features? No. YouTube Help states that verified channels do not get extra features on YouTube. The badge is about identity, not about unlocking tools. How long does advanced verification take? Reported guidance puts ID or video verification review at about 24 hours. Building channel history instead takes about two months of clean activity, as reported. Treat both as estimates, not guarantees. Can I buy a verification badge? No. Applications are free inside YouTube Studio, and no seller can grant a badge. Anyone asking for payment is running a scam, so report them and never share your password. Sources — Check It YourselfYouTube Help: Verify your YouTube account YouTube Help: Verification badges on channels Related on CreatorPlaybook: YouTube Handle Taken or Channel Name Wrong? How to Change Your Name and Handle
- CreatorPlaybook Team
- 29 Oct, 2026
YouTube Handle Taken or Channel Name Wrong? How to Change Your Name and Handle
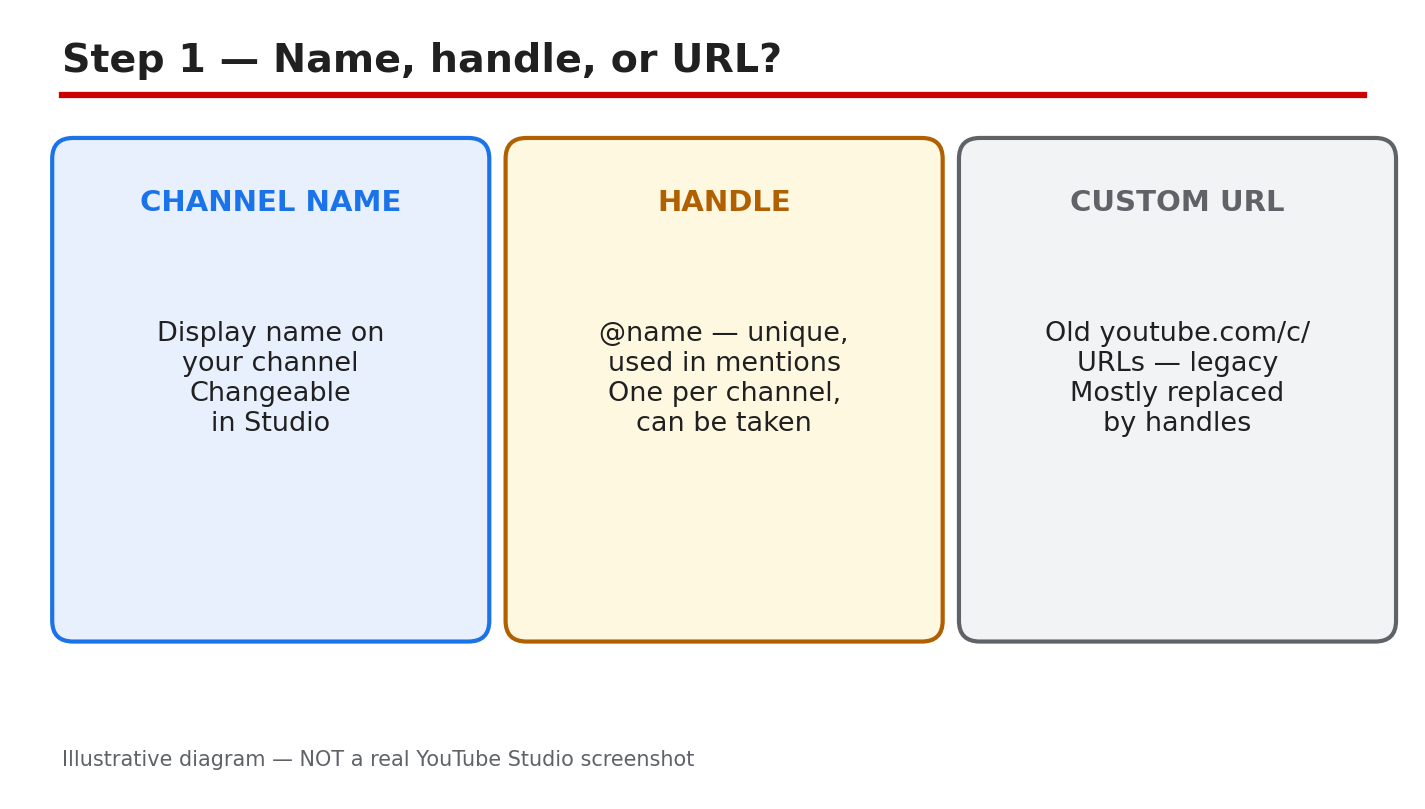
Your channel name is what viewers read, and your handle is the @name they use to mention and find you. When the name feels wrong or the handle you want is taken, changing both again and again causes confusion: old mentions stop matching and viewers cannot find you. Learn what each label does, change it in the right place in Studio, and tell your viewers once, clearly. Work in order. First, tell the name, the handle, and any old custom URL apart. Next, check the rules and whether the handle is free. Then make one change, save it, and check the channel page. Do not copy a known creator. Related reading: How to Choose a Good YouTube Channel Name, which helps you pick a name worth keeping. What You Will LearnHow the channel name, handle, and old custom URL differ. Where to change them in Studio, and how to save. The handle rules, including length, characters, and change limits. What to check before you rename a channel. What to do when the handle you want is taken. How to roll out a rename so viewers still find you.Step 1: Tell the Channel Name, Handle, and Custom URL Apart What to do: The channel name is the display name viewers see on your videos, channel page, and comments. The handle is the short @name that identifies your channel in mentions and tags, and it must be unique. A legacy custom URL is an older personalized address, such as youtube.com/c/YourName, that some channels received years ago. The three can match, but they do not have to, and changing the name does not give you the matching handle. Studio path: YouTube Studio > Customization > Profile. Read the current name and handle shown there before you change anything. Example: A creator called “Maya Cooks” uses @maya-cooks-27 because @mayacooks was taken. Viewers find her by the handle, while the name stays readable. Common mistake: Telling viewers to use your old custom URL after a rename. Old links may still work, but viewers need the new name and handle.Illustrative diagram/mock-up — NOT a real YouTube Studio screenshot: channel name, handle, and custom URL compared. Step 2: Change the Name and Handle in the Right Place What to do: Open YouTube Studio, go to Customization, then Profile, and edit the name and handle fields. Type the new name, check the handle, and click PUBLISH to save. Do not look for them under Basic info: the name and handle live under Customization, then Profile, and PUBLISH saves them. After publishing, open your channel page and check the new name and handle. A new name can take a few days to appear everywhere. Studio path: YouTube Studio > Customization > Profile > enter new channel name and handle > PUBLISH. Check the channel page after saving. Example: A creator shortens “Maya Cooks Daily” to “Maya Cooks” under Customization > Profile, clicks PUBLISH, and sees the new name on her channel page. Common mistake: Editing the name under Basic info and clicking Save, then wondering why nothing changed. Use Customization > Profile, then PUBLISH.Illustrative diagram/mock-up — NOT a real YouTube Studio screenshot: Customization, Profile, and the PUBLISH button. Step 3: Check the Handle Rules Before You Choose What to do: A handle must be 3 to 30 characters long, and it can use letters, numbers, underscores, hyphens, periods, and Latin middle dots. Handles are not case-sensitive, so @MayaCooks and @mayacooks count as the same handle, and a handle cannot look like a web address or a phone number. It must not already be in use, and it must follow the Community Guidelines. YouTube can change, reclaim, or remove a handle that breaks the rules. You can change your handle twice within a 14-day period, and changing your channel name can remove a verification badge, so do not spend both changes on a guess. Studio path: YouTube Studio > Customization > Profile > Handle. Studio shows whether the handle is available before you publish. Example: A creator wants @mayacooks, finds it taken, and tries @maya.cooks, which Studio accepts. The periods keep the name readable. Common mistake: Adding a long string of numbers to a taken handle, such as @mayacooks847291. Nobody can remember it or say it aloud.Illustrative diagram/mock-up — NOT a real YouTube Studio screenshot: handle length, allowed characters, and availability checks. Step 4: Check Four Things Before You Rename What to do: First, say the name aloud and spell it. If a viewer cannot spell it after hearing it once, it will be hard to search. Second, check the same name on the other platforms you use, so viewers find one identity everywhere. Third, check the handle is free in Studio before you promise it anywhere. Fourth, check old links and mentions, and plan what still points to the old name. Rename once, with a name you can keep. Studio path: YouTube Studio > Customization > Profile. Type the new handle and watch for the availability message before you click PUBLISH. Example: A creator picks “Maya Cooks,” checks @maya.cooks is free in Studio, and only then tells viewers. The rename takes one change, not three. Common mistake: Announcing the new handle in a video before checking it in Studio. If it is taken, viewers reach someone else.Illustrative diagram/mock-up — NOT a real YouTube Studio screenshot: the four checks before renaming a channel. Step 5: If the Handle You Want Is Taken What to do: Add a readable variation, not a random one. A topic word, a city, or the word “official” keeps the handle clear: @mayacooks becomes @maya.cooks, @mayacooksrecipes, or @mayacooks.official. YouTube also suggests trying periods, numbers, or underscores when the exact handle is taken. Never copy a known creator's name or handle to ride on their audience: impersonation can lead to a strike, and viewers who arrive by mistake will leave. There is no waitlist for a taken handle, so keep creating and check again later. Studio path: YouTube Studio > Customization > Profile > Handle. Try each variation in the Handle field and read the availability message before publishing. Example: A creator finds @mayacooks taken and chooses @maya.cooks. The handle still reads as her name, and viewers can say it without spelling out numbers. Common mistake: Using a famous creator's name with one letter changed. Viewers feel tricked, and YouTube may treat it as impersonation.Illustrative diagram/mock-up — NOT a real YouTube Studio screenshot: readable handle variations when the first choice is taken. Step 6: Roll Out the Rename So Viewers Still Find You What to do: Change the name and handle in Studio first, then update the banner, the About text, and the links that point to the channel. Announce the change once: a short Community post and one mention in a video are enough. Say the old name, the new name, and the new handle, so viewers who search the old name still understand. Keep the old handle in the About text for a while, so old mentions still make sense. Give viewers time to learn the new name before you judge the change. Studio path: YouTube Studio > Customization > Profile > PUBLISH. Update the banner, About text, and links afterwards, from the same Customization area. Example: A creator posts: “Maya Cooks Daily is now Maya Cooks, @maya.cooks.” Viewers who search the old name still find her. Common mistake: Renaming the channel and saying nothing. Viewers think the channel vanished, and old mentions lead nowhere.Illustrative diagram/mock-up — NOT a real YouTube Studio screenshot: the rename rollout checklist for banner, About, and links. ChecklistName, handle, and old custom URL told apart. Change made under Customization > Profile, saved with PUBLISH. Handle checked: length, characters, and availability in Studio. Name easy to say, spell, and search. Same name checked on other platforms. Variation readable, not copied from a known creator. Banner, About, and links updated; change announced once.Frequently Asked Questions Can I change my handle more than once? Yes, but only twice within a 14-day period. Use each change carefully, and check the handle in Studio before you publish it. Why did my verification badge disappear after a rename? Changing your channel name removes the verification badge. Check the current rules before you rename, and do not rename for a small reason. What characters can a handle use? Letters, numbers, underscores, hyphens, periods, and Latin middle dots, 3 to 30 characters. Handles are not case-sensitive, and cannot look like a web address or a phone number. Is there a waitlist for a taken handle? No. A taken handle cannot be reserved or requested. Use a readable variation, keep creating, and check again later. Do old custom URLs still work after a rename? Legacy personalized URLs can keep working, but viewers need the new name and handle to find you reliably. Update your banner, About text, and links, and announce the change once. Change once, in the right place, and tell viewers where to find you. Sources — Check It Yourself Official pages opened and verified live on 29 October 2026. Check the current wording before acting. No official YouTube video is embedded here. No exact official video URL was verified live in this run.How to Choose a Good YouTube Channel Name — CreatorPlaybook Manage your YouTube channel's profile — YouTube Help Change, view, or hide your handle — YouTube Help

- CreatorPlaybook Team
- 25 Oct, 2026
How to Choose a Good YouTube Channel Name
A good YouTube channel name is easy to say, easy to spell, and easy to remember, and it gives viewers a hint about what your channel is about. It is not the reason a channel grows, but a confusing name can slow growth, because viewers cannot search for you, recommend you, or remember you after watching one video. The best name is usually simple, not clever, and it leaves room for your channel to grow without trapping you in one narrow topic. This guide explains how to choose a good YouTube channel name, with practical tests you can run before you commit. It covers what makes a name memorable, how to check availability and trademarks, how to avoid common naming traps, and when to change a name. You will end with a shortlist of names that are clear, available, and flexible enough for the channel you want to build. Related guides: How to Script a YouTube Video, How to Make Educational Videos That Rank, and How to Stay Consistent Without Burnout. What You Will LearnWhat makes a channel name easy to remember and search How to brainstorm names from your topic and audience How to check availability across YouTube and social platforms How to avoid trademark, spelling, and meaning traps How to test a name with real people before choosing When and how to change a channel name safelyStep 1: Aim for Short, Clear, and Easy to Say What to do: Aim for a name with two or three words, that is easy to pronounce, easy to spell after hearing it once, and easy to type without looking it up. A name that is short and clear works in video introductions, in comments, in search, and in word-of-mouth recommendations. Avoid long phrases, unusual spellings, numbers that are hard to explain, and words that sound like other words when spoken aloud. How to do it in simple steps:Write names with two or three words, not five or six. Say each name aloud, as if introducing a video. Ask someone to spell it after hearing it once. Drop any name that needs explanation, spelling help, or a story to make sense.Practical example: A beginner cooking creator chooses "Simple Home Kitchen" over "The Art of Culinary Excellence for Everyday Home Cooks." The shorter name is easy to say, easy to search, and still tells viewers what the channel is about. Common mistake to avoid: Choosing a clever pun that only makes sense in writing, or a name with creative spelling, such as replacing letters with numbers. Viewers who hear the name cannot find it, and search engines may not match it to what they type. Illustrative image: A good name is short, clear, and easy to say aloud. This is an illustrative image, not a screenshot of your channel or another creator's work. Step 2: Connect the Name to Your Topic, Without Trapping Yourself What to do: Connect the name to your topic or audience, but leave room to grow. A name that includes your exact first topic can become a problem if you later expand, while a name that is completely unrelated gives viewers no clue about your channel. The balance is a name that hints at the topic, such as a broad theme, a feeling, or an audience, rather than a single tool, trend, or video format. How to do it in simple steps:List three words that describe your topic, audience, or style. Combine them into names that hint at the topic, without naming one product. Ask whether the name still works if you expand to a related topic. Avoid years, trends, and platform names that will date quickly.Practical example: A creator teaching beginner video skills chooses "Creator Basics" rather than "CapCut Tutorials 2026." The first name still works if they later teach lighting, scripting, or editing in other tools, while the second traps them in one tool and one year. Common mistake to avoid: Naming a channel after a single trend, tool, or game that may fade. When the trend fades, the name becomes confusing, and changing it later costs recognition you have already built. Illustrative image: Hint at your topic, but do not trap yourself in one tool or trend. This is an illustrative image, not a screenshot of your channel or another creator's work. Step 3: Brainstorm Widely, Then Shortlist Ruthlessly What to do: Brainstorm at least twenty names before shortlisting, using different approaches: topic words, audience words, your own name, a feeling, or a simple combination. Do not judge ideas while brainstorming; the goal is quantity first. Then shortlist ruthlessly: keep only names that are short, clear, pronounceable, and connected to your topic, and drop names that are clever but confusing, long, or hard to spell. How to do it in simple steps:Brainstorm twenty names in one sitting, without judging them. Try different styles: topic plus audience, name plus topic, and simple phrases. Score each name for clarity, pronounceability, and topic fit. Keep a shortlist of five, and drop the rest, even if you liked them at first.Practical example: A creator brainstorms twenty names for a beginner filming channel, including "Film School for Beginners," "Simple Creator Studio," and "The Daily Camera Show." They shortlist five, then test those five, rather than choosing the first idea that sounded good. Common mistake to avoid: Falling in love with the first name you think of, and refusing to consider alternatives. The first idea is rarely the best, and a short brainstorm often produces a clearer, more memorable name. Illustrative image: Brainstorm twenty names, then shortlist five ruthlessly. This is an illustrative image, not a screenshot of your channel or another creator's work. Step 4: Check Availability, Handles, and Trademarks Carefully What to do: Check whether your shortlisted names are available as a YouTube channel name, a handle, and on other platforms you may use, such as Instagram or a website domain. Also check for existing brands, trademarks, or well-known channels with the same or a very similar name, to avoid confusion and legal problems. A name that is taken by a large channel, even on another platform, will cause confusion and make it hard for viewers to find you. How to do it in simple steps:Search each shortlisted name on YouTube, Google, and social platforms. Check whether the handle and a simple domain are available. Look for existing brands or trademarks with the same name in your topic. Drop any name that is already used by a known channel or brand.Practical example: A creator loves "Studio Simple," but finds a large design channel with the same name and a registered brand. They choose "Simple Studio Sessions" instead, which is available, distinct, and still clear, avoiding confusion from the start. Common mistake to avoid: Adding numbers, underscores, or extra words to copy a taken name, such as "Studio Simple Official 123." Viewers will still confuse you with the original, and the name looks less trustworthy. Illustrative image: Check YouTube, handles, domains, and brands before you commit. This is an illustrative image, not a screenshot of your channel or another creator's work. Step 5: Test the Name With Real People, Out Loud What to do: Test your shortlist with real people, out loud, before you commit. Say the name as if introducing a video, ask people to spell it, and ask what kind of channel they expect from the name alone. A name that passes this test is easy to remember, easy to find, and sets the right expectation. A name that fails, even if you love it, will cost you viewers who cannot find or recommend you. How to do it in simple steps:Say each name aloud to five people who do not know your channel. Ask them to spell it, and to guess what the channel is about. Ask them a day later which name they remember. Choose the name that is remembered, spelled correctly, and understood.Practical example: A creator tests three names with friends. One name is remembered by everyone and spelled correctly, one is forgotten, and one is guessed as a gaming channel when it is actually about cooking. The creator chooses the remembered, correctly understood name, even though it was not their personal favourite. Common mistake to avoid: Testing a name only in writing, with people who already know your channel. Written tests hide pronunciation and spelling problems, and friends who know you will be polite about a confusing name. Illustrative image: Test names out loud, with people who do not know your channel. This is an illustrative image, not a screenshot of your channel or another creator's work. Step 6: Choose, Use Consistently, and Change Only With a Plan What to do: Choose one name, use it consistently everywhere, and give it time to work. Use the same name and handle on YouTube, social platforms, and your channel banner and description, so viewers can find you in one place. If you later need to change the name, do it with a plan: announce it, explain it briefly, keep your content and style the same, and update all platforms at once, so viewers are not confused. How to do it in simple steps:Choose one name from your tested shortlist, and commit to it. Use the same name, handle, and logo style everywhere. Give the name at least several months before judging it. If changing, announce the new name in a video and update all platforms together.Practical example: A creator launches as "Simple Home Kitchen," uses the same name on YouTube and Instagram, and introduces every video with it. After a year, viewers search for that exact name, recommend it by word of mouth, and find it easily, because it never changed. Common mistake to avoid: Changing your channel name every few months because growth is slow. Frequent changes erase recognition, confuse subscribers, and hide the real problem, which is usually content, consistency, or topic, not the name. Illustrative image: Use one name consistently, and change it only with a clear plan. This is an illustrative image, not a screenshot of your channel or another creator's work. Checklist for Choosing a YouTube Channel NameName is two or three words, easy to say and spell Name hints at topic, without trapping you in one tool or trend Twenty names brainstormed, five shortlisted Availability checked on YouTube, handles, and domains No conflict with known brands or channels Name tested out loud, remembered, and understood Same name used consistently on all platformsFrequently Asked Questions Should I use my real name? It depends. A personal name works well for personality-based channels and is flexible, but it gives no clue about the topic. A topic-based name works well for teaching channels, but it can feel less personal. Either can work, if it is clear and consistent. Can I change my channel name later? Yes, YouTube allows name changes, but changing often confuses viewers and loses recognition. Choose carefully at first, and change only with a clear announcement and updated branding everywhere. Does the name affect search? Somewhat. A name that includes a topic word can help viewers understand your channel, but titles, descriptions, and video content matter far more for search than the channel name alone. What if my ideal name is taken? Choose a distinct alternative, not a copy with numbers or extra words. A clear, original name that is available is better than a confusing copy of a known channel. Should the name be funny or clever? Only if it is also clear and easy to remember. A clever name that confuses viewers is worse than a simple name that tells them what to expect. A good channel name does one job well: it helps viewers find you, remember you, and understand you, in a few seconds. Choose a short, clear, available name, test it out loud, and then focus on the videos that will make that name worth remembering.
- CreatorPlaybook Team
- 25 Oct, 2026
YouTube Branding: Logo, Banner and Intro
Branding is how viewers recognise your channel in a crowded feed. A consistent logo, banner, colour scheme, and intro tell viewers, in seconds, that this video belongs to a channel they know, or a channel worth remembering. Branding does not need to be expensive or complicated; it needs to be consistent. Many small creators delay branding until they are “big enough.” That is backwards: clear branding helps small channels look trustworthy and professional from the start, which helps them grow. This guide shows you how to create a simple, consistent brand with free or low-cost tools. Related guides: How to Make a Channel Trailer, How to Design Clickable Thumbnails, and How to Improve Click-Through Rate. What You Will LearnWhat YouTube branding includes, beyond a logo How to choose colours, fonts, and a style that fit your niche How to design a clear logo that works at small sizes How to design a banner that states your channel's promise How to make a short intro that does not waste viewer time How to apply branding consistently across videos and thumbnailsStep 1: Choose a Simple Brand Style for Your Niche What to do: Choose two main colours, one or two fonts, and a tone, such as calm, playful, or professional, that fits your niche and audience. Write these choices down, so every future design follows them. How to do it in simple steps:Look at three channels in your niche and note which colours and styles feel right for your audience. Choose two colours: one main colour and one accent colour, with strong contrast. Choose one font for titles and one for body text, both easy to read. Write your brand choices in a short note, and use them for every design.Practical example: A gardening channel chooses green as a main colour, cream as an accent, and a friendly, rounded font. Its logo, banner, thumbnails, and end screens all use the same colours and font, so viewers recognise its videos instantly in a feed. Common mistake to avoid: Using a different colour scheme, font, and style for every video. Random styling makes a channel look disorganised, and viewers cannot learn to recognise it, even if individual designs look good. Illustrative image: Two colours and one style keep a channel recognisable. This is an illustrative image, not a screenshot of your channel or another creator's work. Step 2: Design a Logo That Works at Small Sizes What to do: Design a simple logo that is clear as a tiny profile picture. A logo is often seen at less than one centimetre wide, so simple shapes, one or two colours, and no small text work best. How to do it in simple steps:Sketch three simple ideas: an initial, a symbol, or a simple illustration of your niche. Choose the simplest idea, and remove any detail that disappears at small size. Test the logo at profile-picture size, on both light and dark backgrounds. Save it in a square format, with a version for light and dark backgrounds if needed.Practical example: A photography channel uses a simple camera shape in its main colour, with no text. At small size, the camera shape is still clear, while a logo with a long channel name in small letters would be unreadable. Common mistake to avoid: Designing a detailed logo with a long name, a tagline, and several colours. At profile-picture size, detail becomes a blur, and viewers cannot tell what the logo is, or remember it. Illustrative image: Simple logos stay clear at tiny sizes. This is an illustrative image, not a screenshot of your channel or another creator's work. Step 3: Design a Banner That States Your Promise What to do: Your banner is the large image at the top of your channel page. It should show your channel name, what you help viewers do, and when you upload, in a design that works on desktop, tablet, and mobile, where only the centre is visible. How to do it in simple steps:Use the recommended banner size in YouTube Studio, and keep key text in the safe centre area. Write your channel name, your promise in a few words, and your upload schedule. Use your brand colours and fonts, and one simple image or pattern. Preview the banner on desktop and mobile before saving it.Practical example: A cooking channel's banner reads, in the centre, “Healthy Dinners in 20 Minutes — New videos every Friday.” A new visitor instantly knows the topic, the benefit, and when to return, without reading a long description. Common mistake to avoid: Putting important text at the edges of a banner, where it is cut off on mobile, or filling the banner with social media handles, logos, and clutter. Most visitors see only the centre, so that is where the message must be. Illustrative image: Keep banner text in the safe centre area. This is an illustrative image, not a screenshot of your channel or another creator's work. Step 4: Make a Short Intro That Respects Viewer Time What to do: A channel intro is a 3 to 5 second clip at the start of videos, showing your logo and channel name, with a short sound if you use one. It should brand the video without delaying the content viewers came for. How to do it in simple steps:Design a 3 to 5 second animation or static logo card, using your brand colours. Keep music, if any, short and quiet, so it does not overpower your voice. Place the intro after a brief hook, or at the very start only if it is under 5 seconds. Use the same intro in every video, so viewers learn to recognise it.Practical example: A creator opens videos with a 4-second logo card and a soft sound, then immediately states the video's topic. Viewers recognise the channel, but the content starts within seconds, so retention stays strong. Common mistake to avoid: Using a 15 to 20 second animated intro with loud music before every video. Long intros delay the content, and many viewers leave before the video actually starts, especially on mobile. Illustrative image: A 3 to 5 second intro brands without delaying content. This is an illustrative image, not a screenshot of your channel or another creator's work. Step 5: Apply Branding to Thumbnails and Video Style What to do: Use your brand colours, fonts, and layout consistently in thumbnails, titles, and video graphics, such as lower-thirds and end screens. Consistency helps viewers spot your videos in a feed, even before reading the title. How to do it in simple steps:Create a thumbnail template with your colours, font, and logo position. Use the same lower-third style for names and key points in videos. Use the same end screen layout, with your colours and subscribe prompt. Check that new thumbnails still look clear at small size, even with branding.Practical example: A fitness channel uses the same yellow accent, font, and bottom-left logo on every thumbnail. Viewers scrolling a feed recognise the channel's videos by colour and layout alone, and click because they already trust the style. Common mistake to avoid: Branding every thumbnail so heavily, with large logos and borders, that the subject becomes hard to see. Branding should help recognition, not hide the reason to click. Illustrative image: Consistent colours and layout make videos recognisable. This is an illustrative image, not a screenshot of your channel or another creator's work. Step 6: Review and Refresh Branding Without Starting Over What to do: Review your branding every year, and refresh only what is outdated, such as a blurry logo or a banner with an old schedule. Keep the core colours and style, so existing viewers still recognise you. How to do it in simple steps:Look at your channel page, thumbnails, and recent videos together, and note what looks inconsistent. Ask viewers, in a Community post, what they recognise most about your channel's look. Update only the weakest element, such as the banner or logo resolution. Keep the main colours and style, so the refresh feels familiar, not like a new channel.Practical example: A creator updates a blurry logo to a sharper version in the same colours, and updates a banner schedule from “weekly” to “every Friday.” Viewers notice a cleaner look, but still recognise the channel immediately. Common mistake to avoid: Rebranding completely every few months, with new colours, fonts, and logos each time. Frequent rebrands confuse existing viewers and erase the recognition you built, so refresh gradually, not constantly. Illustrative image: Refresh the weakest element, keep the core style. This is an illustrative image, not a screenshot of your channel or another creator's work. Checklist for YouTube BrandingBrand style chosen: two colours, one or two fonts, one tone, written down Simple logo designed, tested at profile-picture size Banner designed with name, promise, and schedule in the safe centre Intro kept to 3 to 5 seconds, used consistently Thumbnail template, lower-thirds, and end screens using the same style Branding reviewed yearly, refreshed gradually, not completely replacedFrequently Asked Questions Do I need to pay for branding? No. Free design tools, phone apps, and templates are enough for a simple, professional brand. Spend time on clarity and consistency, not money, especially when you are starting out. Should my logo include my channel name? Not necessarily. At small sizes, a simple symbol is often clearer than text. If your channel name is short, you can include it, but test it at profile-picture size first, and keep it readable. How often should I change my banner? Update it when your promise, schedule, or best content changes, or when it looks outdated. A banner that still states your current promise accurately does not need changing just for the sake of change. Do intros hurt retention? Long intros can hurt retention, because they delay content. Short intros of 3 to 5 seconds, placed after a hook, usually do not, because viewers get to the content quickly. What if I am not good at design? Start simple: one symbol, two colours, one font, and a clean layout. Simple branding done consistently looks far more professional than complex branding done inconsistently. You can improve it gradually as you learn. Branding is not about looking fancy. It is about being recognisable and trustworthy, every time a viewer sees your channel. Choose a simple style, apply it consistently to your logo, banner, intro, and thumbnails, and refresh it gradually. Over time, viewers will spot your videos in a feed, and click because they know what to expect.

- CreatorPlaybook Team
- 25 Oct, 2026
How to Make a Channel Trailer
A channel trailer is a short video that tells new visitors, in under a minute, what your channel is about, who it is for, and why they should subscribe. It plays on your channel page for people who have not subscribed yet, so it is often the first impression a new viewer gets. A good trailer is not a showreel of everything you have ever made. It is a focused invitation: one audience, one promise, and one reason to stay. This guide shows you how to plan, script, film, and publish a trailer that turns visitors into subscribers. Related guides: How to Write a Strong Video Hook in the First 30 Seconds, How to Use Playlists to Increase Watch Time, and YouTube Branding: Logo, Banner and Intro. What You Will LearnWhat a channel trailer should do, and what it should not try to do How to define your audience and promise in one sentence How to write a 30 to 60 second trailer script How to film a trailer with simple equipment How to edit a trailer for pace and clarity How to publish, feature, and update your trailer over timeStep 1: Define Your Audience and Promise in One Sentence What to do: Before filming, write one sentence that states who your channel helps and what it helps them do. Every part of the trailer should support that sentence, and anything that does not should be cut. How to do it in simple steps:Write who you help, such as “beginner photographers” or “busy home cooks.” Write what you help them do, such as “take better photos with a phone” or “cook healthy dinners in 20 minutes.” Combine them into one sentence, and read it aloud. Check that your best videos actually deliver that promise.Practical example: “I help beginner photographers take better photos with the phone they already own.” A visitor who is a beginner photographer instantly knows this channel is for them. A visitor who is not can move on, which is fine, because they were unlikely to subscribe anyway. Common mistake to avoid: Trying to appeal to everyone, with a trailer that says “I make videos about lots of stuff.” A channel that tries to be for everyone feels like it is for no one, and visitors leave without subscribing. Illustrative image: One clear audience and promise make a trailer work. This is an illustrative image, not a screenshot of your channel or another creator's work. Step 2: Write a Short Script with Three Parts What to do: A trailer script has three parts: a hook that names the viewer's problem, a promise that shows what the channel offers, and a call to action that asks for a subscription. Keep the whole script to 30 to 60 seconds when spoken. How to do it in simple steps:Hook, 5 to 10 seconds: name a problem your viewer recognises. Promise, 20 to 30 seconds: show three examples of videos that solve that problem. Call to action, 5 to 10 seconds: tell viewers to subscribe and what they will get next. Read the script aloud with a timer, and cut anything that pushes it past 60 seconds.Practical example: “Do your indoor photos look dark and yellow? On this channel, I show beginners how to fix light, composition, and editing with just a phone. Subscribe, and start with the beginner playlist linked below.” The script is short, specific, and ends with a clear next step. Common mistake to avoid: Writing a long life story or listing every topic you have ever covered. New visitors decide in seconds whether to stay, and a long introduction loses them before they hear the promise. Illustrative image: Hook, promise, and call to action in under a minute. This is an illustrative image, not a screenshot of your channel or another creator's work. Step 3: Film with Simple, Clean Footage What to do: Film the trailer speaking to the camera, in good light, with clear audio, and add a few short clips from your best videos to show what viewers will get. Simple, clean footage beats fancy effects that distract from the message. How to do it in simple steps:Film in a quiet room, with light facing you and a plain background. Use a phone or camera on a stable stand, at eye level. Speak naturally, as if talking to one new viewer, not a crowd. Collect three or four short clips, 2 to 3 seconds each, from your best videos.Practical example: A cooking creator films a 40-second trailer in a kitchen, speaking to the camera, with three quick clips of finished dishes. Viewers see the creator, hear the promise, and see the results, all in under a minute. Common mistake to avoid: Filming a trailer with loud background music, fast cuts, and text on screen at the same time. Viewers cannot follow the message when sound, movement, and text compete, and they leave confused. Illustrative image: Clean light, clear audio, and a calm background. This is an illustrative image, not a screenshot of your channel or another creator's work. Step 4: Edit for Pace, Not for Show What to do: Edit the trailer so it moves quickly but remains easy to follow. Cut pauses, keep clips short, and use text only to reinforce the promise, such as the channel name or a playlist name. How to do it in simple steps:Cut the script recording into hook, promise, and call to action. Insert short clips during the promise section, to show rather than tell. Add the channel name and a subscribe reminder at the end, not throughout. Watch the trailer on a phone, with sound on and off, to check clarity.Practical example: A trailer that was 90 seconds long, with long pauses, becomes 45 seconds after cutting pauses and shortening clips. The shorter version keeps the same message, but viewers actually watch it to the end. Common mistake to avoid: Adding an intro animation, music, and effects that take 10 seconds before the message starts. New visitors may leave before they hear why they should subscribe, so start with the hook, not with branding. Illustrative image: Fast, clear editing keeps new visitors watching. This is an illustrative image, not a screenshot of your channel or another creator's work. Step 5: Publish and Feature the Trailer on Your Channel Page What to do: Upload the trailer as a normal video, with a clear title and description, then feature it as your channel trailer in YouTube Studio, so non-subscribers see it first when they visit your channel page. How to do it in simple steps:Upload the trailer with a title such as “Welcome to [Channel Name]” and a description stating your promise. In YouTube Studio, set it as the featured trailer for non-subscribers. Link a beginner playlist in the description and in a pinned comment. Check your channel page as a non-subscriber, by viewing it in a private browser window.Practical example: A creator uploads a trailer, features it, and links the beginner playlist below. New visitors watch the trailer, click the playlist, and watch several videos in one visit, instead of leaving after one video. Common mistake to avoid: Uploading a trailer but never featuring it, so it sits in your video list like any other video. A trailer only works as a first impression if new visitors actually see it first. Illustrative image: Feature the trailer so new visitors see it first. This is an illustrative image, not a screenshot of your channel or another creator's work. Step 6: Update the Trailer When Your Channel Changes What to do: Review your trailer every six months, or when your channel's focus, audience, or best videos change. A trailer that promises videos you no longer make will mislead new visitors and hurt trust. How to do it in simple steps:Watch your trailer and ask whether it still describes your current videos. Check whether new visitors comment that the trailer helped, or that it was confusing. Update the clips, promise, or call to action if your focus has changed. Replace the featured trailer, and update the description and playlist links.Practical example: A channel that started with phone photography adds video editing tutorials. The creator updates the trailer to mention both, and links two playlists, so new visitors are not surprised by the wider range of videos. Common mistake to avoid: Leaving a trailer unchanged for years, while your channel moves in a new direction. Visitors who subscribe for the old promise, then find different videos, are more likely to unsubscribe. Illustrative image: A trailer should grow with your channel. This is an illustrative image, not a screenshot of your channel or another creator's work. Checklist for a Channel Trailer That ConvertsAudience and promise defined in one clear sentence Script written: hook, promise, call to action, 30 to 60 seconds Filmed in good light with clear audio, plus short clips from best videos Edited for pace, with text only to reinforce the promise Uploaded and featured for non-subscribers, with a beginner playlist linked Reviewed every six months, and updated when the channel changesFrequently Asked Questions How long should a channel trailer be? Aim for 30 to 60 seconds. Shorter trailers are more likely to be watched to the end, and a trailer that is watched to the end is more likely to earn a subscription than a longer trailer viewers abandon. Do I need a trailer if my channel is small? Yes, especially when you are small. New visitors have no history with your channel, so a short, clear trailer helps them decide quickly whether to subscribe, instead of guessing from a list of videos. Should the trailer be different from a normal video? Yes, in purpose. A normal video teaches one topic in depth. A trailer introduces the channel, shows the range of videos, and invites a subscription. It should not try to teach a full topic. Can I use clips from old videos in a trailer? Yes, if they still represent your current quality and focus. Use short, strong clips that show results, and avoid clips from videos you would not want new visitors to watch first. What if I do not like being on camera? You can still make a trailer with voiceover, text, and clips, without appearing on camera. The key is a clear promise and strong examples, not necessarily a face, although a face can help build trust. A channel trailer is a first impression, not a summary of everything you have done. Define one audience, promise one clear benefit, show it in under a minute, and invite viewers to subscribe and start with your best playlist. Done well, it works for you every time a new visitor finds your channel.