Showing Posts From
Live streaming
 CreatorPlaybook Team
- 30 Oct, 2026
YouTube Scheduled Video or Premiere Not Publishing? Why It Misses the Start Time
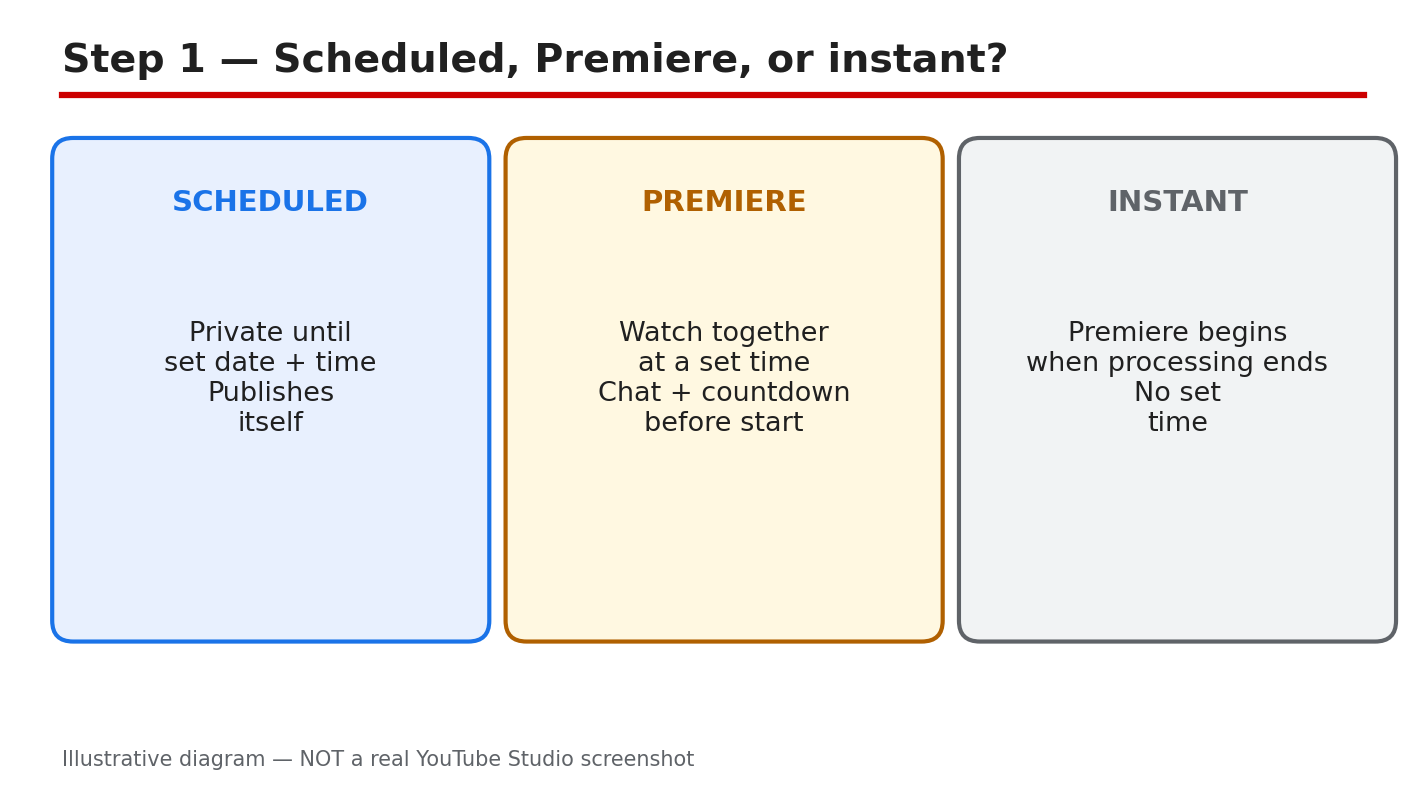
You set the time, told your viewers, and counted down, but when the hour came, nothing happened. A scheduled video or a Premiere can miss its start for a few simple reasons, and most of them are easy to prevent once you know where to look. Most misses come from three causes, and all three are easy to check. This guide explains the difference between a scheduled video, a Premiere, and an instant Premiere, shows you the checks to run the day before, and gives you a plan for the day itself. Work through the six steps, and your next video will start on time. What You Will LearnHow a scheduled video, a Premiere, and an instant Premiere differ. The checks to run the day before, not five minutes before. Why processing, time zones, and format limits delay a start. What to do when a Premiere is stuck at start time. A Premiere-day plan you can reuse for every launch.Step 1: Tell the Three Release Types Apart A scheduled video is a normal upload with a date and time attached. You upload it, set it to go Public at the chosen time, and it stays Private until then. A Premiere is different: your viewers watch together at a set time, with a countdown, a live chat, and a shared watch page. An instant Premiere is the third type: it begins as soon as processing finishes, instead of at a set date and time. If you only want the video to go live at a set time, a scheduled upload is enough, and there is no countdown for viewers to join. Example: you schedule a tutorial for Friday 6 p.m. and it goes Public on its own. For a countdown and live chat, set it as a Premiere instead. Common mistake: calling every scheduled upload a Premiere. Figure 1: Illustrative diagram comparing a scheduled video, a Premiere, and an instant Premiere. This is a mock-up, not a real YouTube Studio screenshot. Step 2: Check Everything Before Start Time Run these checks the day before, not five minutes before the start. In YouTube Studio, go to Content, open the video row, and check the upload and processing status. On the watch page, open Settings, then Quality, to confirm HD is ready. Then re-read the scheduled date, time, and time zone. Finally, confirm the video is eligible for a Premiere: Shorts are not supported, neither are 360 or VR180 videos, and neither is output over 1080p. Also check that the video is not still uploading, because a schedule cannot start a file that has not finished uploading. Example: on Thursday, confirm HD is ready and the time reads Friday 6 p.m. in your own time zone. Common mistake: checking the schedule while travelling and reading the time in the wrong zone. Figure 2: Illustrative diagram of the pre-start checks: processing status, date, time, time zone, and eligibility. This is a mock-up, not a real YouTube Studio screenshot. Step 3: Learn Why It Misses the Time The most common cause is unfinished processing. YouTube publishes the low-quality version first and adds HD later, so a video can be live but not finished. A 60-minute 4K video at 30 frames per second can take up to 4 hours to finish high-resolution processing, and 60 frames per second takes longer. A longer video, a higher resolution, and a higher frame rate all add processing time, and busy traffic on YouTube can slow it further. The second cause is the wrong time zone: the video is fine, but the clock was set for another zone. The third cause is format: Shorts, 360 and VR180 videos, and output over 1080p are not supported for Premieres, as YouTube Help states. Example: you upload a 4K video at 5 p.m. and schedule the Premiere for 7 p.m., but the video is still processing at 7 p.m. Common mistake: uploading an hour before a Premiere and assuming the schedule guarantees a start. Upload hours early instead. Figure 3: Illustrative diagram of the three delay causes: processing, time zone, and unsupported format. This is a mock-up, not a real YouTube Studio screenshot. Step 4: Run the Pre-Premiere Checks Run this list the day before, and again three hours before the start. First, confirm processing has finished and HD is available in the Quality menu. Second, re-read the date, time, and time zone, and compare them with the time you announced to your viewers. Third, confirm the format is supported: a regular video at 1080p or lower, not a Short, and not a 360 or VR180 video. Fourth, check for anything that can block publishing, such as a Community Guidelines strike. YouTube Help says a strike can stop a Premiere from publishing during the penalty period. If anything on the list fails, move the start time and tell your viewers before the countdown begins. Example: three hours before the start, the quality menu tops out at 360p, so you move the Premiere later and tell viewers in a Community post. Common mistake: skipping the three-hour check because the video looked fine yesterday. Figure 4: Illustrative diagram of the pre-Premiere checklist: processed, time correct, format supported, no block. This is a mock-up, not a real YouTube Studio screenshot. Step 5: What to Do If It Is Stuck Check the processing status before you panic. Processing may finish late, and a Premiere can begin once the video is ready. Do not delete the video, and do not upload a second copy in a rush. If the delay is long, re-schedule the Premiere and tell your viewers in a Community post and on the watch page. If the audience is waiting and the wait is urgent, start a normal live stream instead and play the video there. Tell viewers what happened and when the new start time is, so they come back instead of leaving. Example: the countdown ends but the video does not play, so you post an update, move the Premiere by one hour, and your viewers return. Common mistake: re-uploading the same video while the first copy is still processing, which splits the audience. Figure 5: Illustrative diagram of the stuck-Premiere options: wait, re-schedule and tell viewers, or go live instead. This is a mock-up, not a real YouTube Studio screenshot. Step 6: Follow a Premiere-Day Plan Upload the video the day before and keep it Private until the start. Confirm HD has finished three hours before the start. Open the watch page and check the date, time, and time zone one last time. Be in the chat five minutes early, pin a comment with your key links, and stay after the Premiere to reply to the first comments. After the Premiere ends, the video stays as a regular upload, and the chat replay is available. Keep the schedule unchanged on the day itself, unless a check fails. Example: your Premiere is Saturday 6 p.m., so you upload on Friday, confirm HD on Saturday at 3 p.m., and join the chat at 5:55 p.m. Common mistake: leaving the chat empty until the video starts. The countdown is part of the event. Figure 6: Illustrative diagram of the Premiere-day plan: upload early, confirm HD, join chat early, pin the replay. This is a mock-up, not a real YouTube Studio screenshot. Quick ChecklistUploaded the video the day before, as Private. Confirmed HD is finished three hours before the start. Checked the date, time, and time zone twice. Confirmed the format is supported for Premieres. Checked for strikes or restrictions that can block publishing. Joined the chat five minutes early and pinned the replay.Frequently Asked Questions Why did my Premiere not start at the scheduled time? Unfinished processing is the most common reason. YouTube publishes the low-quality version first and adds HD later, and a 60-minute 4K video at 30 frames per second can take up to 4 hours to finish high-resolution processing. Upload hours early and confirm HD is ready before the start. Check the Quality menu on the watch page to see whether HD is ready. Can I Premiere a Short? No. Shorts are not supported for Premieres, and neither are 360 or VR180 videos, or output over 1080p. What is an instant Premiere? An instant Premiere begins as soon as processing finishes, instead of at a set date and time. My Premiere is stuck. Should I re-upload the video? No, not in a panic. Check the processing status first, then re-schedule and tell your viewers, or start a normal live stream if the wait is urgent. Can a strike stop my Premiere? Yes. YouTube Help says a Community Guidelines strike means the Premiere will not publish during the penalty period. Sources — Check It YourselfYouTube Help: Premiere a new video YouTube Help: Low video quality after upload Related on CreatorPlaybook: YouTube Live Streaming for Beginners
- CreatorPlaybook Team
- 29 Oct, 2026
YouTube Live Stream Keeps Disconnecting? Stream Health Red? Fix It
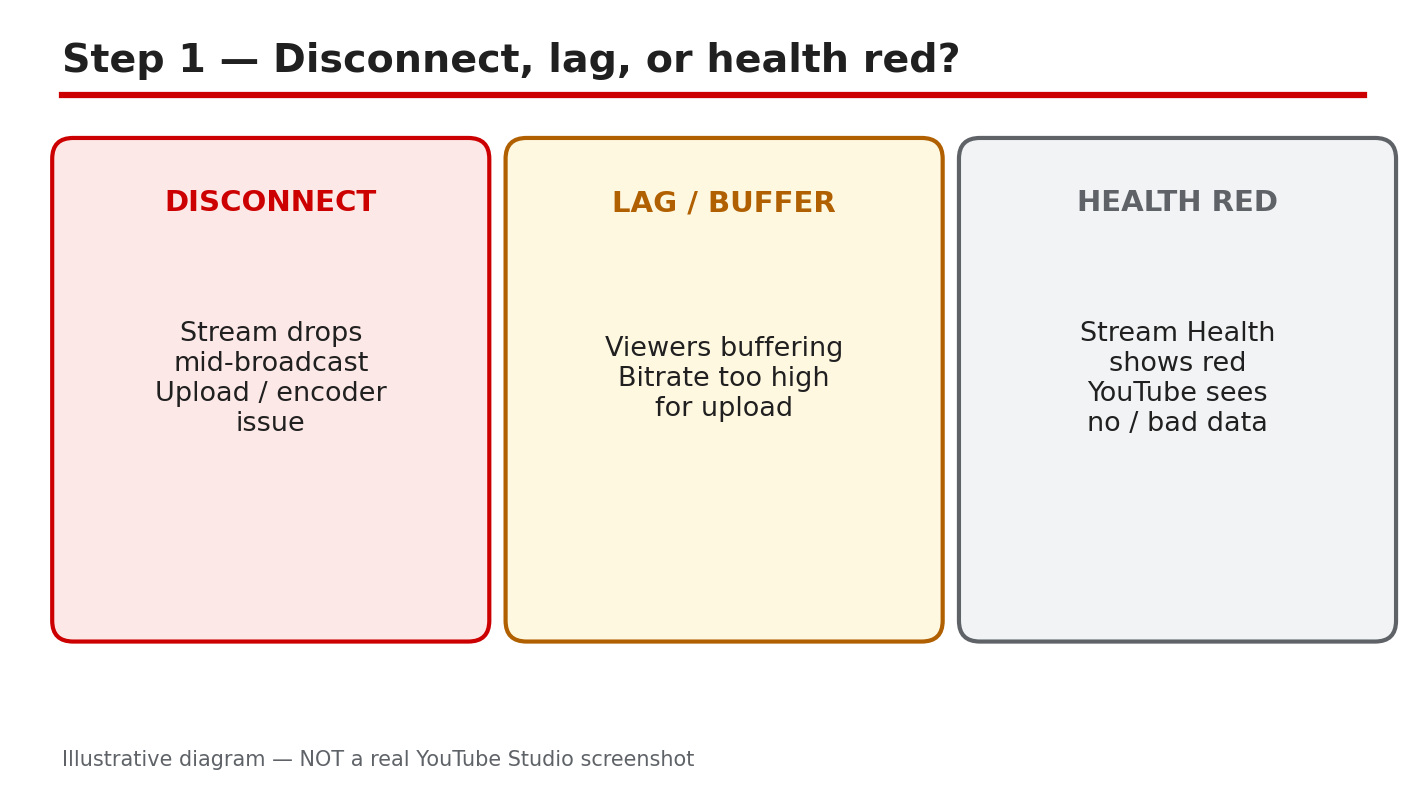
A disconnect can empty a live chat in seconds. The picture freezes, the sound drops, or the stream ends, and viewers leave before you can explain. The cause is often the connection between your encoder and YouTube, not your video idea. A bitrate too high for your upload speed, unstable Wi-Fi, or an overloaded device can each break the stream. This guide helps you tell a disconnect, lag, and a red Stream Health panel apart, check the health panel and your upload speed, and set a bitrate your connection can carry. You will test before you go live, keep a safe copy of your stream key, and learn what to do when the stream drops without ending it early. Bitrates in this guide are the Help page's recommendations for the resolution and frame rate you choose, not fixed rules for every connection. If your upload speed cannot carry the recommended bitrate, use a lower resolution or frame rate first, and let stability beat sharpness. What You Will Learn By the end, you will be able to:Tell a disconnect, lag, and red Stream Health apart. Read the Stream Health panel and test your upload speed. Match your bitrate to the Help page recommendations and your upload. Run pre-stream checks, including a safe stream key. Act calmly during a disconnect without ending the stream early. Build a stable-stream plan and record locally too.Step 1: Name the problem you see What to do: Name what viewers see before you change any setting. A disconnect means the stream drops or ends. Lag or buffering means the picture stutters while the stream stays live, often because the bitrate is too high for the upload speed. A red Stream Health panel means YouTube is receiving no data or poor-quality data, even if your own screen looks fine. Studio path: YouTube Studio > Create > Go Live > Stream. Watch the Stream Health panel and your encoder together, so you can match the sign to the panel. Example: Nina's viewers see buffering, but her stream stays live. She treats it as lag from a high bitrate, not a disconnect, and lowers the bitrate instead of ending the stream. Common mistake: Ending the stream at the first freeze. A short freeze can be lag, and ending the stream loses the viewers who were still watching.Illustrative diagram, not a real screenshot: disconnect, lag, and Stream Health red. Step 2: Check Stream Health and your speed What to do: Open the Stream Health panel and read the bitrate and frame drops it shows. Then run a connection speed test on the same device and network you will stream from, and write down the upload speed. Compare the two: if the panel shows drops while the upload speed is low, the connection, not the content, is the first suspect. Studio path: YouTube Studio > Create > Go Live > Stream > Stream Health panel. Keep the panel open while you test, so you can see changes as you make them. Example: Omar's panel shows frame drops and his upload test reads 4 Mbps. He knows a high-resolution bitrate will not fit, so he plans a lower resolution before he goes live. Common mistake: Checking speed on your phone while streaming from a PC. Test the device and network you will actually use.Illustrative diagram, not a real screenshot: Stream Health panel and speed test. Step 3: Find the usual causes What to do: Compare your settings with the Help page's recommended bitrate ranges, and treat them as recommendations, not fixed rules. The page recommends, for H.264 video: 720p at 30 frames per second, minimum 3 Mbps and recommended 8 Mbps; 1080p at 30 frames per second, minimum 5 Mbps and recommended 14 Mbps; and 1080p at 60 frames per second, minimum 6 Mbps and recommended 17 Mbps. Higher resolutions need higher ranges. If your upload speed cannot carry the range for the resolution you chose, lower the resolution or frame rate. Also check for unstable Wi-Fi and an overloaded PC or phone. Studio path: Your encoder settings for bitrate, resolution, and frame rate, checked against the Help page linked in Sources and the Stream Health panel. Example: Lee streams at 1080p and 60 frames per second, but his upload speed is 8 Mbps. He drops to 720p at 30 frames per second and the drops stop. Common mistake: Choosing 4K because the camera can shoot it. The stream needs upload speed to match, not only a camera that can record 4K.Illustrative diagram, not a real screenshot: bitrate, Wi-Fi, and overloaded device. Step 4: Run the pre-stream checks What to do: Test before you go live, including audio and movement, as the Help page advises. Check your upload speed, set the bitrate to fit it, use wired ethernet or strong Wi-Fi close to the router, and close apps that load the PC or phone. Copy the stream key from the Stream tab and save it safely. Never share it in chat, on screen, or in a screenshot. Studio path: YouTube Studio > Create > Go Live > Stream. Copy the stream key, set the encoder to fit your upload speed, and run a short private test first. Example: Ana tests for five minutes with music and walking around the room. Her panel stays green, so she knows the settings fit before viewers arrive. Common mistake: Showing the stream key on screen while setting up. Cover the key, and never post a screenshot that shows it.Illustrative diagram, not a real screenshot: pre-stream checks and stream key safety. Step 5: What to do during a disconnect What to do: Stay calm and keep talking if your audio is still live. Let the encoder try to reconnect on its own, and do not end the stream early for a short drop. If your encoder lets you change settings live, lower the bitrate or resolution to a level your upload can carry. Stability beats sharpness: a steady, softer picture keeps viewers longer than a sharp picture that keeps freezing. Studio path: Your encoder and the Stream Health panel. Watch the panel while you lower the bitrate, and wait for it to turn green before you raise settings again. Example: Sam's picture freezes for ten seconds, but his audio stays live. He keeps talking, lowers his bitrate, and the picture returns without ending the stream. Common mistake: Ending and restarting the stream again and again. Each restart splits the audience and the chat, and the same bitrate problem returns.Illustrative diagram, not a real screenshot: keep talking, reconnect, lower bitrate. Step 6: Build a stable-stream plan What to do: Write down the settings that worked: resolution, frame rate, bitrate, connection type, and device. Use those settings as your starting point for the next stream, and change only one thing at a time when you test a higher quality. Record locally too, so a disconnect does not lose the whole show. Studio path: YouTube Studio > Create > Go Live > Stream for the next stream, with your written settings and a local recording running. Example: Mia writes down 720p, 30 frames per second, and wired ethernet. Her next stream uses the same settings, records locally, and stays stable. Common mistake: Raising every setting for a big event. A special stream is the worst time to test a bitrate your connection has never carried.Illustrative diagram, not a real screenshot: written settings and local recording. Checklist: Before you go live Tick each item before you press Go Live.I have named the problem: disconnect, lag, or Stream Health red. I have checked the Stream Health panel and my upload speed. My bitrate fits my upload speed for the resolution I chose. I use wired ethernet or strong Wi-Fi. My stream key is saved safely and never shared. I record locally too, in case the stream drops.Frequently Asked Questions Why does my stream disconnect at the same time each day? A pattern can point to a network cause, such as others using the same Wi-Fi at that time. Test at that time, check the panel, and try wired ethernet or a lower bitrate. What bitrate should I use for 1080p? The Help page recommends, for H.264 video, a minimum of 5 Mbps and a recommended 14 Mbps at 30 frames per second, and a minimum of 6 Mbps and a recommended 17 Mbps at 60 frames per second. If your upload cannot carry that range, use 720p instead. Is red Stream Health always my fault? Not always. A red panel means YouTube is receiving no data or poor-quality data, usually from the connection or encoder. Check your panel, speed, and encoder first. Should I end the stream when it disconnects? No, not for a short drop. Keep talking if audio is live, let the encoder reconnect, and lower the bitrate if you can. End the stream only if it will not reconnect and the panel stays red. Do I need to be 16 to live stream? The Help page says you must be at least 16 to live stream, with a verified channel and no live-streaming restrictions in the past 90 days. Sources — Check It Yourself Check the official pages below before your next stream. No official YouTube video is embedded in this post, because no exact official video was verified live in this run.Live streaming guide: YouTube Live Streaming for Beginners Choose live encoder settings, bitrates, and resolutions Get started with live streaming

- CreatorPlaybook Team
- 25 Oct, 2026
How to Stream on YouTube
Streaming on YouTube is different from uploading a finished video. A stream is live, unedited, and interactive, which makes it exciting, but also unforgiving. There is no second take, no quiet edit, and no hiding a mistake. The good news is that a good stream does not need a complex studio. It needs a clear purpose, a reliable setup, and a simple plan for what happens before, during, and after you go live. This guide focuses on the practical workflow of streaming: choosing a stream format, setting up software and scenes, testing audio and internet, running the live chat, and turning the stream into later videos. It is written for creators who already know the basics of going live and want a repeatable streaming routine they can use every week, whether they stream from a phone, a computer, or both. Related guides: YouTube Live Streaming for Beginners, How to Repurpose One Video into Shorts, Reels and Posts, and How to Read and Use the YouTube Studio App. What You Will LearnHow to choose a stream format that fits your channel How to set up scenes, audio, and overlays simply How to test internet, audio, and video before going live How to run chat without losing control of the stream How to keep a stream engaging for its full length How to reuse a stream as edited videos and ShortsStep 1: Choose a Stream Format With a Clear Job What to do: Give every stream one job: answer questions, teach a skill live, work alongside viewers, play or demonstrate something, or celebrate a milestone. A stream without a job drifts, loses viewers, and is hard to promote. A stream with a job is easy to title, easy to explain in the first minute, and easy to turn into clips afterwards. Choose a length you can sustain, such as 45 to 90 minutes, rather than an open-ended marathon. How to do it in simple steps:Pick one format: question-and-answer, tutorial, work-along, discussion, or showcase. Write one sentence that explains what viewers will get by joining live. Plan three segments, such as welcome, main activity, and viewer questions. Set a start time and a realistic end time, and tell viewers both.Practical example: A tutorial creator runs a weekly 60-minute live workshop: 10 minutes of welcome and questions, 35 minutes of building a project step by step, and 15 minutes of viewer questions. Viewers know what to expect, return each week, and the recording becomes a useful tutorial afterwards. Common mistake to avoid: Starting a stream with no plan and hoping chat will provide the content. Chat helps, but it cannot carry a stream that has no structure, especially for a small channel with few live viewers at first. Illustrative image: Give every stream one clear job and three simple segments. This is an illustrative image, not a screenshot of your channel or another creator's work. Step 2: Set Up Scenes, Audio, and Overlays Simply What to do: Use streaming software, such as OBS Studio, to build a few simple scenes: a starting screen, a main camera or screen-share scene, and a break or ending screen. Keep overlays minimal: your channel name, the stream topic, and a simple lower-third for questions. Audio matters more than overlays, so use an external microphone, monitor your levels, and keep background music low enough that your voice stays clear. How to do it in simple steps:Create three scenes: starting, main, and ending. Add your camera, microphone, and screen share to the main scene. Set audio levels so your voice peaks comfortably, without distortion. Test switching scenes before the stream, not during it.Practical example: A coding creator uses a main scene with screen share large and camera small in the corner, a starting screen with the topic and start time, and an ending screen thanking viewers. The setup looks clean, switches smoothly, and takes only a few minutes to prepare each week. Common mistake to avoid: Adding animated overlays, alerts, tickers, and multiple cameras before the basics work. Flashy scenes distract viewers and hide audio or internet problems that actually end streams. Illustrative image: Three simple scenes and clear audio beat a complex overlay. This is an illustrative image, not a screenshot of your channel or another creator's work. Step 3: Test Internet, Audio, and Video Before You Go Live What to do: Test everything in a private or unlisted stream before your public stream, especially if you changed software, audio, or internet settings. Check upload speed, audio clarity, camera framing, and screen-share readability. A ten-minute test prevents most live disasters, including silent audio, a frozen screen, or a stream that drops every few minutes. Keep a short pre-stream checklist and use it every time. How to do it in simple steps:Run a private test stream and watch it on another device. Speak, play any music, and share your screen, checking each sound. Check that text on screen is readable on a phone, not only on a monitor. Close unnecessary programmes that use internet or processing power.Practical example: A creator tests a new microphone in a private stream and discovers it is set to the laptop microphone instead. The fix takes two minutes before the stream, but would have ruined the first 20 minutes of a public stream. Common mistake to avoid: Going live for the first time with a new setup, in front of an audience, without a test. Live viewers forgive small mistakes, but they rarely stay through silent audio or a frozen screen. Illustrative image: A private test stream catches audio and video problems early. This is an illustrative image, not a screenshot of your channel or another creator's work. Step 4: Open Strong, and Welcome Viewers by Name and Question What to do: Start every stream with a clear welcome in the first minute: who you are, what the stream will cover, and what viewers should do. Greet early viewers, read a few chat messages aloud, and state the plan, so late joiners can catch up quickly. A strong opening matters even more live than in edited video, because viewers decide in seconds whether to stay, and a stream has no thumbnail or edit to save a slow start. How to do it in simple steps:Begin on time, with camera and audio ready, not with setup talk. State the topic, the plan, and the end time in the first minute. Ask a simple opening question for chat to answer. Pin or repeat the topic for viewers who join later.Practical example: A study stream opens with, "Welcome to our 60-minute focus session. We will work in two 25-minute blocks, with questions in between. Tell me in chat what you are working on today." Viewers immediately know the format and join in, instead of wondering what the stream is about. Common mistake to avoid: Spending the first ten minutes waiting for viewers, adjusting settings on camera, or saying, "We will start soon." Late viewers who join during that wait usually leave before the stream properly begins. Illustrative image: Open on time with a clear topic, plan, and question for chat. This is an illustrative image, not a screenshot of your channel or another creator's work. Step 5: Run Chat With Clear Rules and a Simple Rhythm What to do: Treat chat as part of the show, not as a distraction. Set simple rules, such as no insults and no spam, use slow mode or moderators when needed, and answer chat in batches rather than reading every message the moment it appears. A rhythm helps: work or teach for a few minutes, then pause for chat, then continue. This keeps the stream moving for viewers who are watching, not only for those who are typing. How to do it in simple steps:State chat rules briefly at the start, and pin them if possible. Appoint a trusted moderator for larger streams, or use YouTube's moderation tools. Answer questions in groups, naming the viewer and the question. Ignore or hide disruptive messages calmly, without arguing on stream.Practical example: A question-and-answer creator collects questions for ten minutes, then answers five in a row, then opens chat again. Viewers get thoughtful answers, the stream keeps a steady pace, and the host is not constantly interrupted mid-sentence. Common mistake to avoid: Trying to read and answer every chat message instantly. The stream becomes chaotic, the main topic disappears, and quiet viewers who came to learn leave. Illustrative image: Answer chat in batches, with clear rules and a steady rhythm. This is an illustrative image, not a screenshot of your channel or another creator's work. Step 6: End Cleanly, and Turn the Stream Into Lasting Videos What to do: End every stream with a summary, a thank-you, and a clear next step, such as the next stream date or a related video to watch. Then turn the recording into lasting content: cut the best segments into a tutorial, a highlight video, or Shorts, add chapters and a clear title, and remove long silences or setup sections. A stream that lives only as a long replay helps few viewers; the same stream, edited into focused videos, can keep working for months. How to do it in simple steps:End on time, summarise the main points, and thank viewers and moderators. Review the recording and note timestamps for the best moments. Cut one or two focused videos, plus a few Shorts, from the stream. Retitle and add chapters, so the replay is useful for new viewers.Practical example: A 60-minute workshop becomes a 12-minute tutorial, three Shorts answering common questions, and a chaptered replay. The stream itself brought live viewers, but the edited versions bring search viewers for weeks afterwards. Common mistake to avoid: Leaving every stream as an unedited, two-hour replay with a vague title. Few new viewers will watch it, and the best teaching moments stay buried where search cannot find them. Illustrative image: Edit streams into focused videos and Shorts that last. This is an illustrative image, not a screenshot of your channel or another creator's work. Checklist for Streaming on YouTubeStream format and one clear job chosen Three simple scenes built and tested External microphone and audio levels checked Private test stream completed Strong opening and chat rules prepared End time set, with summary and next step planned Edited highlights and Shorts planned from the recordingFrequently Asked Questions Do I need expensive software to stream? No. Free software such as OBS Studio, a decent microphone, and a stable internet connection are enough for most beginner and intermediate streams. Add paid tools only when a specific limitation appears. Should I stream from a phone or a computer? Use a phone for simple, mobile streams, and a computer when you need screen sharing, multiple scenes, or overlays. Many creators use both, choosing the tool that fits each stream format. How long should a stream be? Long enough to deliver its job, usually 45 to 90 minutes for most formats. Shorter, focused streams often keep viewers better than very long streams that drift. What if few viewers join live? That is normal at first. Treat the stream as a recording session with live interaction as a bonus, promote it in advance, keep a regular schedule, and turn the recording into edited videos that grow over time. Can I stream and upload regular videos? Yes, if the schedule is sustainable. Many creators stream once a week and upload edited videos on other days, using streams to answer questions and edited videos to reach search viewers. Streaming rewards preparation, not perfection. Choose a format, test your setup, open strong, run chat with a rhythm, and turn every stream into videos that keep working after you go offline.
- CreatorPlaybook Team
- 25 Oct, 2026
YouTube Live Streaming for Beginners
Related guides: How to Grow with the YouTube Community Tab, Collaboration Ideas for Small Creators, and How to Use Playlists to Increase Watch Time. Live streaming feels different from a recorded video. There is no editing, no second take, and viewers can talk to you in real time. That can feel scary, but it is also why live streams build loyalty: viewers meet the real person behind the channel, ask questions, and feel part of a shared moment. You do not need expensive equipment or a large audience to start. A simple first stream, with a clear topic, a stable setup, and a plan for talking to chat, can teach you more about your audience than ten recorded videos. This guide walks you through your first live streams step by step. What You Will LearnWhat makes a live stream different from a recorded video How to choose a simple topic for your first stream How to set up audio, video, and internet for a stable stream How to plan a loose structure so you are not stuck for words How to talk to chat, handle trolls, and keep the stream friendly How to review a stream and improve the next oneStep 1: Choose a Simple First Stream Topic What to do: Pick a topic you can talk about for 30 to 45 minutes without slides or complicated demonstrations. A question-and-answer session, a beginner tutorial, or a casual discussion of a topic you know well works better than a complex live project. How to do it in simple steps:List five topics you could discuss comfortably from memory. Choose the one viewers ask about most in comments. Write a title that states the topic and the benefit, such as “Beginner Photography Questions, Answered Live.” Write a short description explaining who the stream is for and what questions you will cover.Practical example: A cooking creator's first stream is “Ask Me Anything About Weeknight Dinners.” Viewers bring the questions, the creator answers from experience, and no recipe needs to be cooked live. The stream is useful, interactive, and low-pressure. Common mistake to avoid: Planning a first stream around a difficult live demonstration, such as building something complex on camera. If the project goes wrong, the stream stalls, and a beginner host has to fix a problem while talking to chat at the same time. Illustrative image: A simple, familiar topic makes a first stream easier. This is an illustrative image, not a screenshot of your channel or another creator's work. Step 2: Set Up Stable Audio, Video, and Internet What to do: Test your setup before you go live. Good audio matters more than perfect video: viewers will leave a stream with echo or muffled sound faster than one with slightly soft video. A stable internet connection matters more than high resolution. How to do it in simple steps:Use a phone, webcam, or camera that you have already tested for recorded videos. Use earphones or a simple microphone to reduce echo. Film in a quiet room with light facing you, not behind you. Do a short private or unlisted test stream to check sound, picture, and connection. Keep a charger plugged in, and close other apps that use internet.Practical example: A creator tests a 10-minute private stream the day before, discovers the room echoes, and adds a rug and closes a window. The next day's public stream sounds clear, because the problem was found in testing, not live. Common mistake to avoid: Going live for the first time with untested equipment, in a noisy room, on a weak connection. Technical problems in the first minutes drive viewers away before they hear what you have to say. Illustrative image: Test audio and connection before you go live. This is an illustrative image, not a screenshot of your channel or another creator's work. Step 3: Plan a Loose Structure, Not a Script What to do: Write a simple outline: a welcome, three main points or segments, and a closing. A loose structure keeps you talking without sounding scripted, and gives viewers a reason to stay for the next segment. How to do it in simple steps:Write a welcome line: who you are, what the stream is about, and how viewers can ask questions. List three segments, each about 10 minutes, such as three common beginner mistakes. Write one question for each segment to ask chat, so viewers can join in. Write a closing line: what to watch next, and when the next stream will be.Practical example: A guitar stream runs: welcome and warm-up, three beginner chord tips with chat questions, then a short live practice session. Viewers know what is coming, and the host never has to wonder what to say next. Common mistake to avoid: Going live with no plan and saying, “So, what should we talk about?” Viewers who join a stream with no direction leave quickly, because they cannot tell whether the stream will be worth their time. Illustrative image: A loose outline keeps a live stream moving. This is an illustrative image, not a screenshot of your channel or another creator's work. Step 4: Promote the Stream Before It Starts What to do: Tell viewers in advance, so they can plan to join. A scheduled stream, announced in a video, a Community post, and a short reminder, will usually draw more live viewers than a surprise stream. How to do it in simple steps:Schedule the stream at least a few days ahead, with a clear title and description. Mention it at the end of your previous video. Post a Community update on the day of the stream, with the time and topic. Start on time, even if only a few viewers are present, because late starts lose early joiners.Practical example: A creator schedules a Saturday morning stream on Wednesday, mentions it in Friday's video, and posts a reminder Saturday morning. Viewers who would have missed a surprise stream can join, ask questions, and invite friends. Common mistake to avoid: Going live without any notice and expecting a large audience. Even loyal subscribers need time to notice a notification and join, especially if they are in different time zones. Illustrative image: Advance notice helps viewers plan to join live. This is an illustrative image, not a screenshot of your channel or another creator's work. Step 5: Talk to Chat and Keep the Stream Friendly What to do: Read chat regularly, answer questions by name when you can, and set a friendly tone early. Acknowledge viewers, repeat questions aloud for people listening without reading chat, and keep the conversation on topic without being harsh. How to do it in simple steps:Welcome early viewers by name and restate the topic every 10 minutes for newcomers. Read a question aloud, answer it, then ask a follow-up question to chat. Use moderation tools: hide or block abusive comments calmly, without arguing. If chat is quiet, ask a simple question, such as “Where are you watching from?”Practical example: A host reads, “Priya asks how to practise chords without hurting fingers,” answers with a short practice tip, then asks chat, “How long do you practise each day?” One question becomes a conversation, not just a lecture. Common mistake to avoid: Ignoring chat for long stretches, or arguing with a troll on camera. Ignored viewers leave, and arguments make other viewers uncomfortable. A calm, brief moderation action keeps the stream friendly for everyone else. Illustrative image: Reading chat aloud makes viewers feel included. This is an illustrative image, not a screenshot of your channel or another creator's work. Step 6: Review the Stream and Improve the Next One What to do: After the stream, watch part of the replay, check how many viewers stayed, and note which segments earned the most chat activity. Use one improvement for the next stream, not ten at once. How to do it in simple steps:Watch the first 10 minutes and one middle segment of the replay. Note where audio, lighting, or pacing could improve. Check live viewer numbers and chat activity over time in Analytics. Choose one change for the next stream, such as better audio, a shorter intro, or more chat questions.Practical example: A creator notices viewers dropped off during a long, quiet demonstration. For the next stream, they shorten demonstrations and add a chat question every few minutes. Retention improves without changing the topic or equipment. Common mistake to avoid: Judging a first stream only by live viewer numbers. A first stream with ten engaged viewers who ask great questions is a success. The goal is learning and connection, not a record audience on day one. Illustrative image: One improvement per stream builds skill steadily. This is an illustrative image, not a screenshot of your channel or another creator's work. Checklist for Your First Live StreamsSimple, familiar topic chosen, with a clear title and description Audio, video, and internet tested in a short private stream Loose outline written: welcome, three segments, closing Stream scheduled and announced in a video and a Community post Chat plan ready: welcome viewers, read questions aloud, moderate calmly Replay reviewed, with one improvement chosen for the next streamFrequently Asked Questions How long should a first live stream be? Thirty to 45 minutes is a good length for a first stream. It is long enough for real conversation, but short enough to stay energetic. Longer streams can come later, once you know your pacing. Do I need a large audience to go live? No. Small, live audiences are often more engaged than large, passive ones, because everyone can be heard. A stream with a handful of active viewers is a great place to learn. Can I stream from my phone? Yes, many creators start with a phone, especially for casual question-and-answer streams. Use a stable stand, good light, and earphones, and test the connection before you go live. What if no one joins? Start on time, talk as if viewers are present, and cover your planned points. Late joiners will find a stream already in progress, and the replay can still be useful for viewers who watch later. Should I keep the replay public? If the stream went well and the content is still useful, keeping it public can help new viewers. If there were long technical problems or mistakes, you can keep it unlisted, edit a highlight, or remove it, and use what you learned next time. Live streaming is a skill, not a talent you either have or do not have. Start small, test your setup, plan a loose outline, talk to chat, and improve one thing at a time. Your first stream does not need to be perfect; it needs to be real, helpful, and friendly enough that viewers want to join the next one.