Showing Posts From
Copyright
 CreatorPlaybook Team
- 12 Nov, 2026
Shorts Song Missing from the Music Library? Licensing and Country Limits Explained
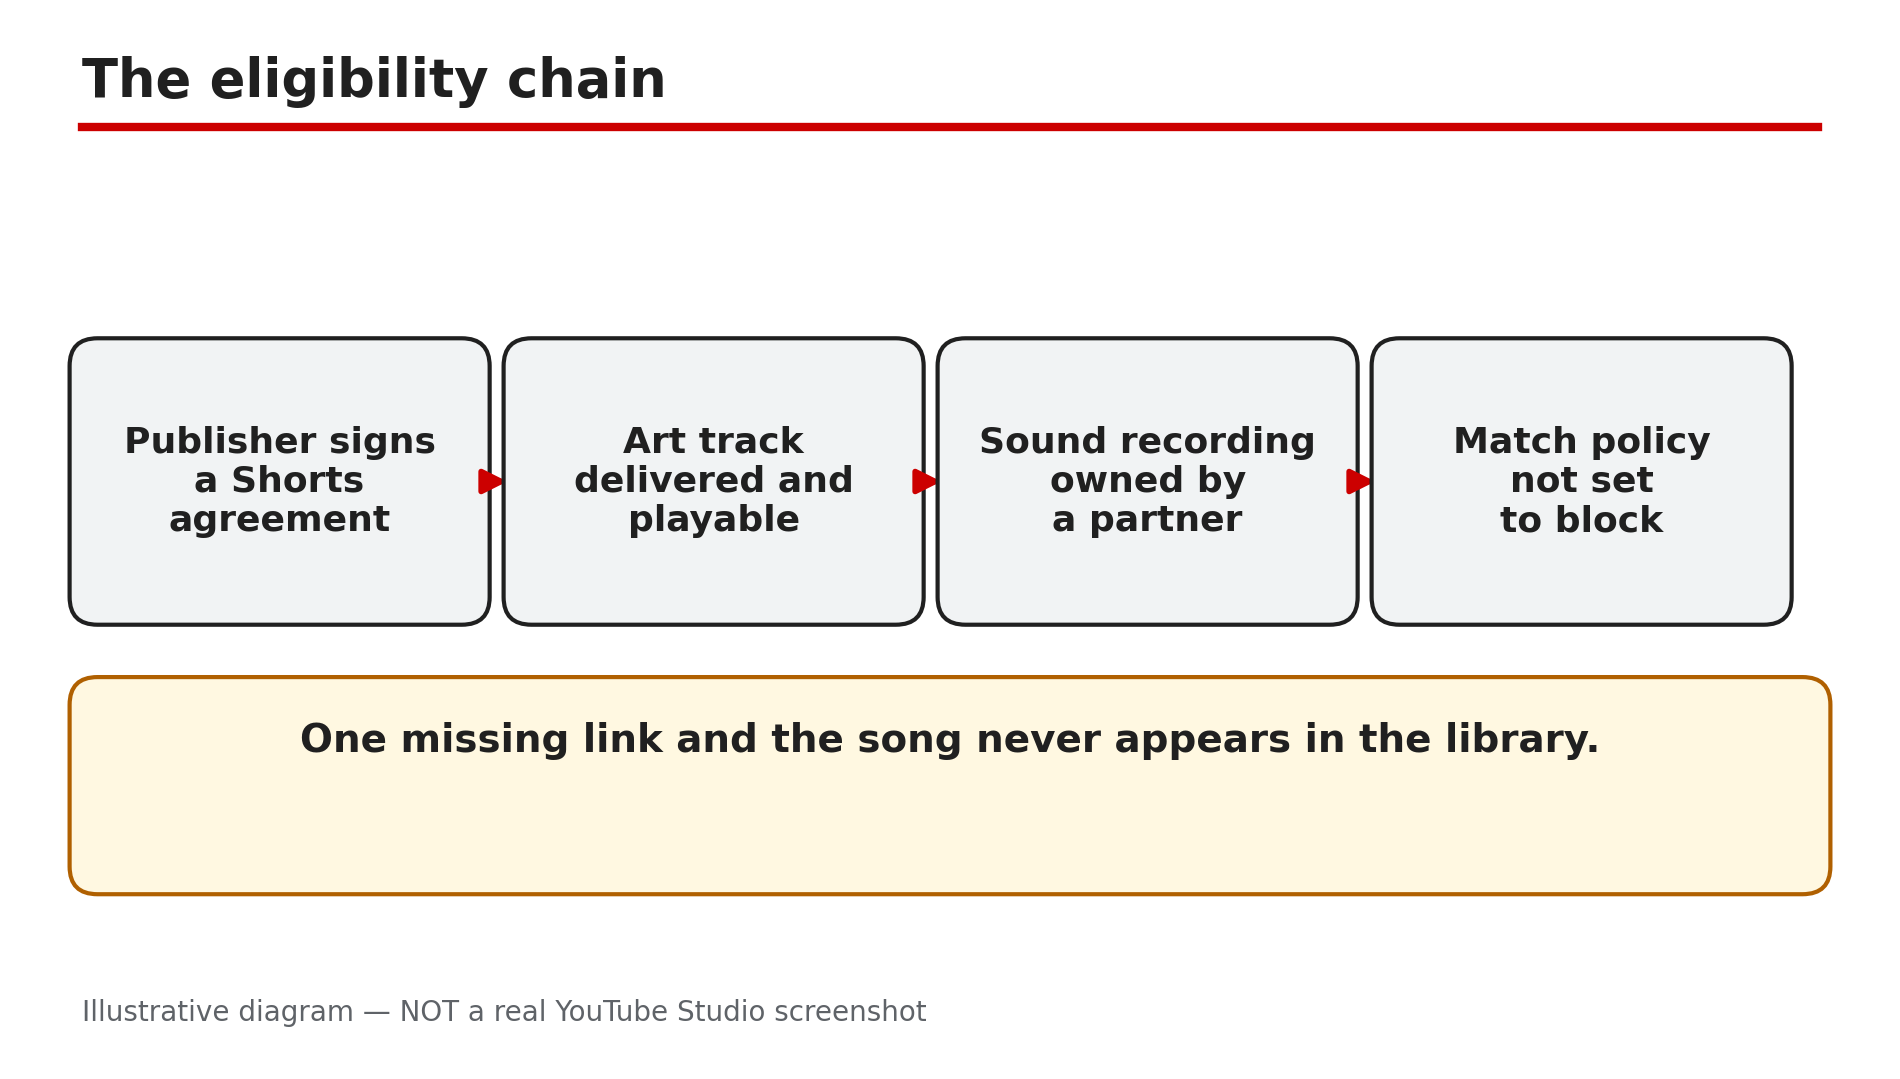
You open the Shorts editor, tap Add sound, search for a song you heard everywhere this week — and it is not there. No result, no error, just silence. Before you assume the app is broken, or download the song from somewhere else, stop: a song appears in the Shorts music library only if its publisher has signed a Shorts agreement with YouTube and the track is cleared for your country. When either condition fails, the song is simply absent. What You Will LearnWhy a song appears only if its publisher signed an agreement How territory ownership decides availability The 90-second limit — why some tracks allow less Why a song can disappear after a deal lapses Why TikTok and Instagram sounds are not licensed for YouTube The safe alternative: the YouTube Audio LibraryStep 1 — Check the eligibility chain: a song needs a Shorts agreement, an art track and a playable policy What to do: A missing song is usually a licensing gap — check the chain before trying to fix the app. How: YouTube's Help page "Music eligibility for YouTube Shorts" applies only to music partners who have a Shorts agreement with YouTube. For a song to be eligible, its art track and embedded sound recording must come from a partner who has a Shorts agreement, and the recording's match policy must be playable and not set to block. If any link in that chain is missing — the publisher never signed, the track was never delivered, or the rights holder set the policy to block — the song does not appear in the library at all. Example: A creator searches for a chart-topping song and finds nothing, but finds a ten-year-old track instantly — the old track's label signed a Shorts agreement years ago; the new song's publisher has not. Common mistake: Reinstalling the app or switching accounts to "fix" a missing song. The library is the same for every account in the same country.Illustrative diagram: the four links a song needs before it appears in the Shorts library. Step 2 — Check territory: a song cleared in one country can be blocked in another What to do: Availability varies by country — a song your friend abroad can use may not exist in your library. How: YouTube's Help page says the art track and the sound recording will not be available in territories where ownership is missing or belongs to a partner who has not agreed to Shorts terms. Rights are negotiated country by country, so a track can be cleared in the United States and blocked in India, or the other way round — and a Short built on it can be muted or unavailable in some regions even after it is published. YouTube's separate Help page adds that when YouTube and a music partner cannot agree on new terms, content with that partner's music becomes unavailable in certain regions. Example: Two creators in different countries search for the same song. One finds it and makes a Short; the other finds nothing. Common mistake: Using a VPN to make the song appear. Do not do this: it is an attempt to bypass regional music licensing, and it does not give you a licence for the song.Illustrative diagram: a song can be cleared in one country and blocked in another. Step 3 — Check the time limit: most tracks allow up to 90 seconds, some only 60 or 30 What to do: When you pick a track, read the seconds it covers — the limit is per track. How: YouTube's Help page says that depending on the song, you may be able to add up to 90 seconds of music in your three-minute Short when using YouTube tools, and selecting an audio track shows how many seconds it will cover. Some tracks are limited to 60 or 30 seconds — the cap is set by the rights holder, not by YouTube. A three-minute Short cannot be scored end to end: even the longest allowance covers only 90 seconds. Example: A creator builds a 90-second Short and picks a track that covers 60 seconds. The music stops two-thirds of the way through — the track's own limit, shown when she selected it. Common mistake: Assuming every library song allows 90 seconds. Check the seconds shown for the track you picked.Illustrative diagram: library tracks cover up to 90, 60 or 30 seconds depending on the song. Step 4 — Check whether the song vanished after a deal lapsed: tracks can disappear mid-use What to do: If a song you used before is suddenly gone, check whether a deal ended — and check your old Shorts too. How: YouTube's Help page on music availability says that when YouTube and a music partner cannot agree on new licensing terms, content containing that partner's music may become unavailable in certain regions — including Shorts you already made, which "may also become unavailable". The same page says a new agreement brings the impacted content back automatically. For a Short that has gone unavailable, YouTube says the remove-or-replace tools are not available for Shorts made with its editing tools — download the Short from Studio and upload it again with different audio. Example: A creator's most-viewed Short suddenly shows as unavailable in three countries — the label's deal had lapsed there. Two months later a new deal is signed and the Short reappears on its own. Common mistake: Deleting the Short and re-uploading it with the same song the day it disappears. The song is still unlicensed in that territory, so the new upload has the same problem.Illustrative diagram: a lapsed licensing deal can make a song and its Shorts unavailable. Step 5 — Do not borrow sounds from other apps: TikTok and Instagram licences do not carry over What to do: Use only music from YouTube's own libraries — a trending sound from TikTok or Instagram is licensed for that app. How: Each platform negotiates its own licences with labels, and a licence for TikTok covers use inside TikTok, not on YouTube. Downloading a trending sound from another app and adding it to your Short in an external editor means the song did not come from the Shorts audio library, so YouTube treats it as an ordinary copyrighted recording: Content ID can match it, and the rights holder can claim it, block it or take it down. Our guide on Shorts music that disappeared after upload covers what happens when that claim lands — including the reported 24 September 2026 change, under which new one-to-three-minute Shorts with an active claim are no longer automatically blocked. Example: A creator downloads a viral sound from Instagram, edits it into a Short in CapCut, and uploads it. Content ID matches the recording and the Short is claimed — the same song, picked from the Shorts library, would have been licensed. Common mistake: Thinking "everyone does it" makes it licensed. Widespread use is not a licence.Illustrative diagram: each app's music licence covers only that app. Step 6 — Use the safe alternative: the YouTube Audio Library in Studio What to do: When the song you want is missing, use music from the YouTube Audio Library instead. How: YouTube's Help page says you may also use royalty-free music from the YouTube Audio Library, and that royalty-free music will not receive a Content ID claim. Open it in Studio — youtube.com/audiolibrary — and search by mood, genre and duration: most tracks need no attribution, but some Creative Commons tracks do, so read the licence line and credit the artist where it asks. Download the track, add it to your Short, and upload — the audio is cleared for YouTube, so no claim follows. The trade-off is real: Audio Library tracks are production music, not chart hits — but they will not get your Short muted, claimed or blocked in another country either. Example: A creator cannot find the chart song she wants for a recipe Short. She picks a bright track from the Audio Library, credits the artist as the licence asks, and the Short runs for a year with no claim. Common mistake: Assuming a track from the Shorts library is cleared for a Short made outside YouTube's tools. It is licensed for Shorts only — a track from the Audio Library is the one to use when you edit outside the app.Illustrative diagram: the YouTube Audio Library compared with a song taken from elsewhere. Checklist — Find music for a Short that will not get claimed or muted☐ Searched the Shorts library inside the app ☐ Accepted a missing song as a licensing gap ☐ Checked the track is cleared in my country ☐ Read the seconds the track covers ☐ Did not use a VPN to reach a blocked song ☐ Did not download a trending sound from TikTok or Instagram ☐ Picked an Audio Library track instead ☐ Read the attribution line on Creative Commons tracksFAQs 1. Why is a famous song missing from the Shorts music library? Because its publisher has not signed a Shorts agreement with YouTube, has blocked Shorts use, or has not cleared the track in your territory. 2. Can I use a VPN to get a song that is not available in my country? No — do not. It is an attempt to bypass regional music licensing. Use a track that is cleared where you are. 3. How much of a song can I use in a Short? Up to 90 seconds in a three-minute Short for most tracks, but some are limited to 60 or 30 seconds. The app shows the seconds when you select a track. 4. My Short used a library song and now it is unavailable — what happened? A licensing deal between YouTube and that music partner may have lapsed in your region. YouTube says the Short should become available again automatically if a new agreement is reached. 5. Is the YouTube Audio Library really claim-free? YouTube's Help page says royalty-free music from the Audio Library will not receive a Content ID claim. Some Creative Commons tracks need attribution — read the licence line. SourcesYouTube Help — "Music eligibility for YouTube Shorts" (official page, opened live 12 Nov 2026): https://support.google.com/youtube/answer/13486873?hl=en YouTube Help — "Certain music content may be unavailable on YouTube and YouTube Music" (official page, opened live 12 Nov 2026): https://support.google.com/youtube/answer/9218267?hl=en CreatorPlaybook — "YouTube Shorts Music Disappeared or Muted After Upload? What to Do" (internal link, URL copied from the plan file): </blog/youtube-shorts-music-disappeared-or>
- CreatorPlaybook Team
- 29 Oct, 2026
YouTube Video Blocked in Some Countries or Worldwide? How to Fix It
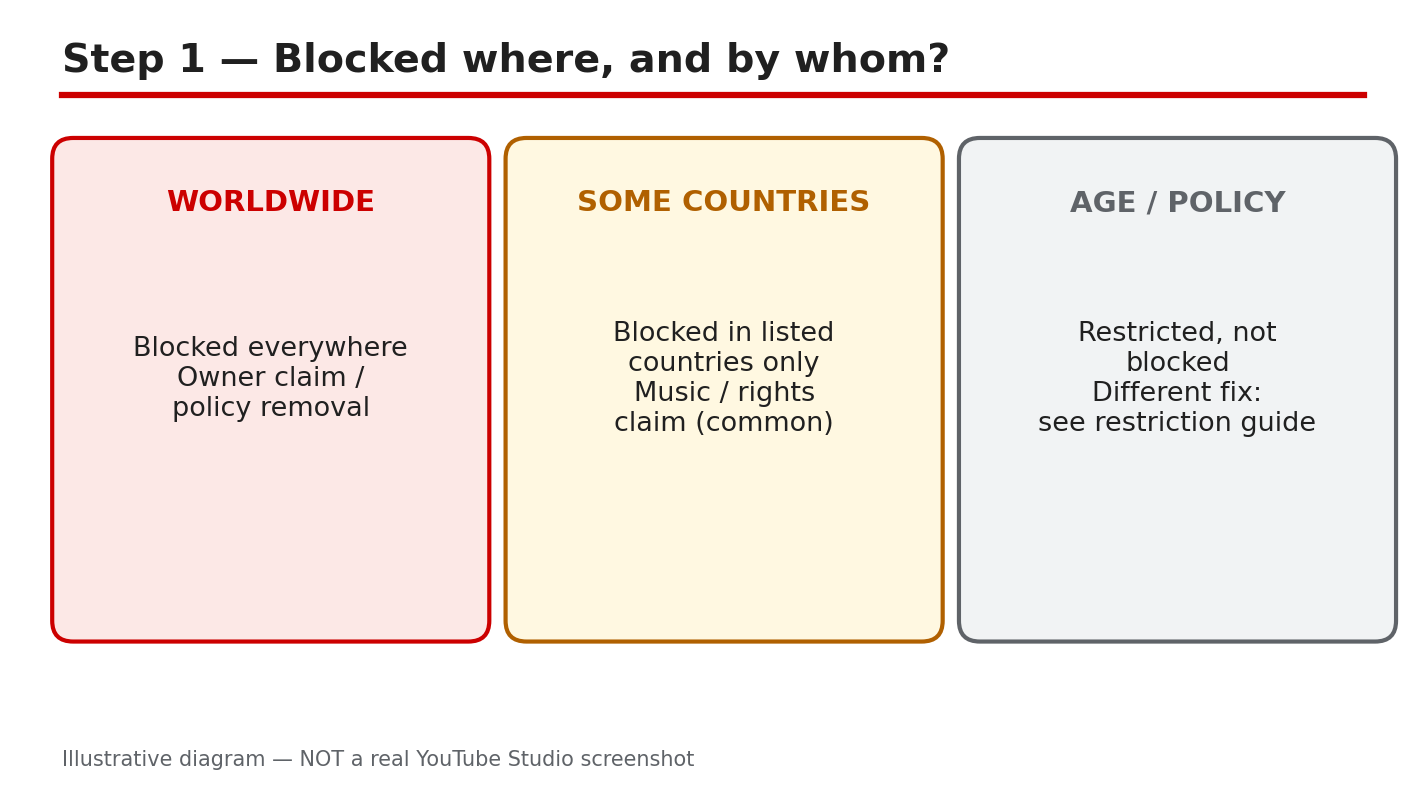
A block can feel sudden and unfair. Your video plays for you, but viewers in some countries see that it is blocked, or the video is blocked everywhere and earns nothing. The fix depends on where it is blocked, who claimed it, and whether the block is a claim, a restriction, or a removal. Acting on the wrong reason, such as disputing a licence you do not have, can waste time and make the problem worse. This guide helps you find the exact block list in YouTube Studio, read which content and owner are named, and choose the fix that matches the evidence. You will check how many territories are affected, whether the video still earns elsewhere, and whether a licence truly covers the blocked countries before you dispute, replace, or erase anything. Work slowly, and keep the claim details in front of you. What You Will Learn By the end, you will be able to:Tell a country block, a worldwide block, and a restriction apart. Find the Blocked in list and the named owner. Explain why music and footage rights differ by country. Check territories, earnings, and licence cover before acting. Replace or erase claimed audio the right way. Build a block-proof plan for your next upload.Step 1: Name the block you have What to do: Name the block before you act. A worldwide block stops the video everywhere. A block in some countries stops it only in the listed territories, while it can still play and earn elsewhere. An age or policy restriction is different: the video may play only for signed-in adults. Each type has a different fix, so write down which one your video has. Studio path: YouTube Studio > Content > Restrictions. Read the restriction type shown for the video before you open the claim. Example: Ravi's video plays in India but is blocked in Germany and France. He treats it as a country block, not a worldwide block, and checks only those two territories. Common mistake: Calling every block a strike. A claim that blocks a video is not the same as a strike, and the fixes are different.Illustrative diagram, not a real screenshot: worldwide, some countries, and restriction compared. Step 2: See the block list and the owner What to do: Open Restrictions for the video and open the claim. Read the Blocked in list, the content that was matched, and the copyright owner named on the claim. Note every territory listed, and whether different owners are named for different countries. The Help page says different claimants in different countries or regions can mean multiple claims, so do not assume one owner controls the whole video. Studio path: YouTube Studio > Content > Restrictions > click the claim > Blocked in list. Read the matched content and the owner before you choose a fix. Example: Meera opens her claim and sees one song, one owner, and 12 blocked territories. She writes down the song and the owner before she acts. Common mistake: Reading only the first territory. A list with many territories needs a different decision from a list with one.Illustrative diagram, not a real screenshot: Blocked in list, content, and owner. Step 3: Why blocks happen What to do: Match the block to its likely rights cause. Music rights are often licensed in some countries only, so a song that is cleared in one country can still be blocked in another. Sports and film footage can have separate rights by region, with a different owner in each place. A local law or policy removal is different from a rights claim. Studio path: YouTube Studio > Content > Restrictions > the claim. Use the named content and owner to judge whether the cause is music, footage, or a policy notice. Example: Tom used a song cleared for the United States, but his video is blocked in Japan. His licence did not cover Japan. Common mistake: Assuming a licence covers the whole world. Many licences cover only named countries, and the Blocked in list shows where cover ends.Illustrative diagram, not a real screenshot: music, footage, and policy causes. Step 4: Check before you act What to do: Answer four questions before you choose a fix. How many territories are blocked? Is the video still earning in the countries where it plays? Is this a claim, with a Blocked in list, or a strike or removal? Does your licence, in writing, cover the blocked countries? If you cannot answer the licence question with evidence, do not dispute. A dispute without evidence can fail and leave the block in place. Studio path: YouTube Studio > Content > Restrictions for the block list, and your licence or purchase record for the cover question. Example: Sara's video is blocked in 3 territories but earns in 40 others. She checks her licence first, before she risks the 40. Common mistake: Disputing first and checking the licence later. A failed dispute does not prove the licence, and the block stays.Illustrative diagram, not a real screenshot: territories, earnings, claim, and licence. Step 5: Fix the block with the right tool What to do: Choose the fix that matches the evidence. If the audio is the problem, use Replace song or Erase song in Studio to remove or swap the claimed audio. If you hold a licence that truly covers the blocked countries, dispute the claim and give the evidence the dispute form asks for. The Help page says credit, owning a copy, and not monetizing are not legitimate dispute reasons, so do not use them. The claimant has 30 days to respond to a dispute. Studio path: YouTube Studio > Content > Restrictions > See details > Take action. Choose Replace song, Erase song, or Dispute, and follow only the option that matches your evidence. Example: Ben's claim names one song and no licence covers it. He uses Replace song with a track from the Audio Library, and removes the claimed audio. Common mistake: Disputing because you paid for the song once. A purchase can cover only named uses or countries, so read the licence terms first.Illustrative diagram, not a real screenshot: replace song, erase song, or dispute. Step 6: Make the next upload block-proof What to do: Build the check into every upload. Use music from the YouTube Audio Library or a licence that names the countries you need, and save the licence with the project file. Before you set a video to Public, open Content > Restrictions and check for claims. After publishing, re-check Restrictions in 24 hours. If a new claim appears, fix the audio before you promote the video. Studio path: YouTube Studio > Content > Restrictions, checked before Public and again 24 hours after publishing. Example: Priya saves her Audio Library licence, checks Restrictions before Public, and re-checks the next day. Her video stays live in the countries her licence covers. Common mistake: Promoting a video before the 24-hour re-check. A late claim can block the video just as viewers start to find it.Illustrative diagram, not a real screenshot: library music, licence saved, re-check. Checklist: Before you dispute or edit Tick each item before you change the video or file a dispute.I know the block type: worldwide, some countries, or restriction. I have read the Blocked in list, the content, and the owner. I know the blocked territories and whether the video earns elsewhere. I know whether this is a claim, a strike, or a removal. My licence, in writing, covers the blocked countries, or I will fix the audio. I have not disputed with credit, a copy, or no monetization as my reason.Frequently Asked Questions Can a video be blocked in one country and earn in another? Yes. A Content ID action can apply to some countries or regions only, so a video can be blocked in the listed territories and still play and earn elsewhere. Check the Blocked in list for the exact territories. Is a blocked video the same as a strike? No. A claim can block, monetize, or track a video, while a strike comes from a removal request and carries channel penalties. Check which one your video has. Should I dispute if I gave the owner credit? No. The Help page says giving credit is not a legitimate reason to dispute. Dispute only if you have a valid reason, such as holding all the necessary rights or a licence that covers the blocked countries. How long does a dispute take? The claimant has 30 days to respond to a dispute. Note the date you filed it, do not file the same dispute again while you wait, and check Restrictions for the result. Can I keep the video and only fix the song? Yes, when the claim is about audio. Use Replace song or Erase song in Studio to remove or swap the claimed audio, instead of deleting the whole video and losing its views and comments. Sources — Check It Yourself Check the official pages below, and re-read your own claim before you act. No official YouTube video is embedded in this post, because no exact official video was verified live in this run.Copyright claim guide: YouTube Copyright Claim? How to Trim, Replace or Erase the Song — and When to Dispute Learn about copyright claims Dispute a copyright claim
- CreatorPlaybook Team
- 29 Oct, 2026
YouTube Strike Appeal: How to Appeal a Community Guidelines Strike the Right Way
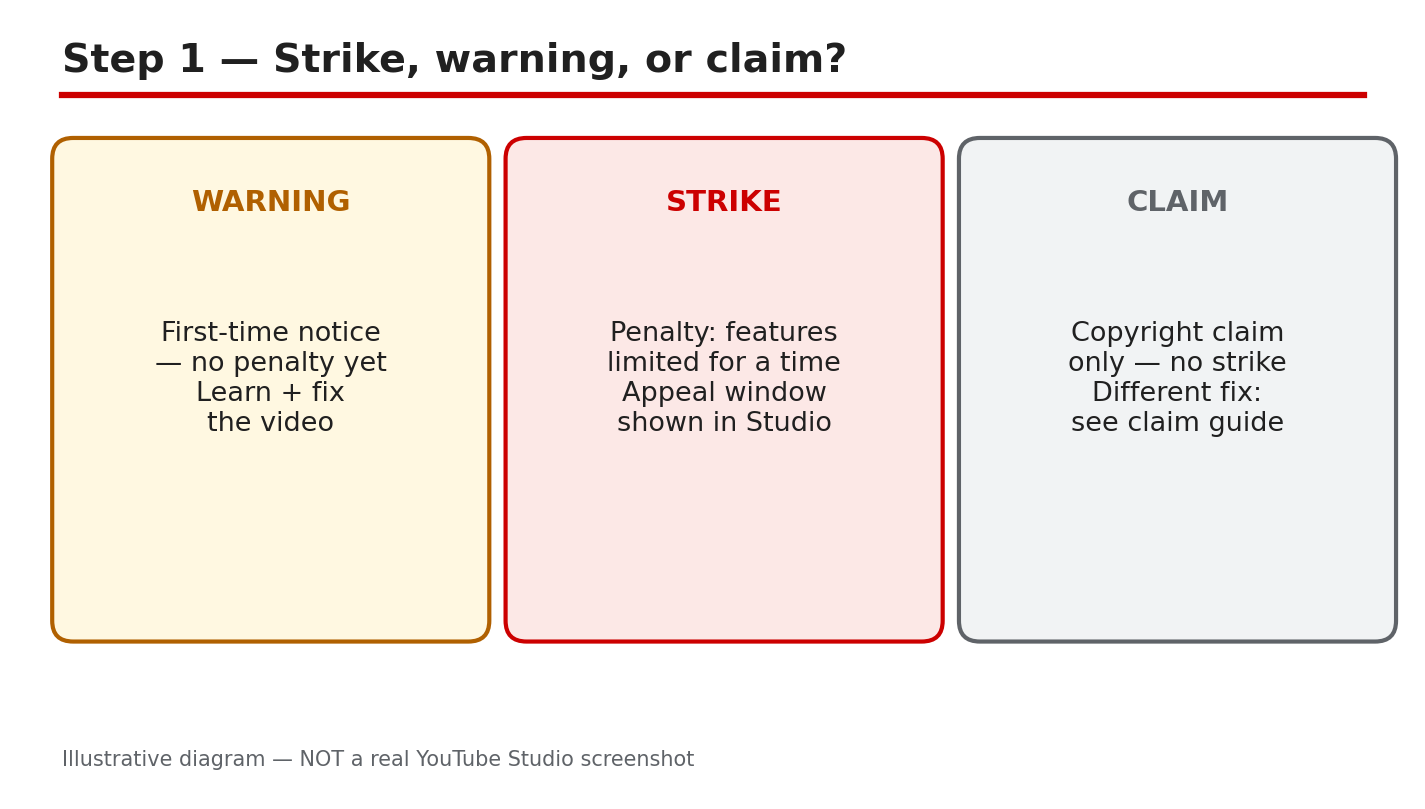
A strike notice can stop your week in its tracks. One email says a video broke a rule, uploads pause, and you are left guessing what went wrong. This guide slows that moment down. You will learn how to tell a warning, a strike, and a Content ID claim apart, find the exact rule YouTube named, write a clear appeal, and protect your record while you wait. For wider channel protection, read How to Protect Your Channel from Strikes, Copyright and Reused Content first. It explains safe music, licences, and reused content. This post focuses only on one job: appealing a Community Guidelines strike correctly, with evidence, and only once, against the rule actually named. What You Will LearnWarning, strike, and Content ID claim: what each one means. Where to find the appeal button and the rule named. The three-strike timings, as reported, and how to confirm them. What evidence makes an appeal clear, and what makes it vague. What to do, and not do, while YouTube reviews your appeal. A clean-record plan for the 90 days after a strike.Step 1: Tell a Warning, a Strike, and a Claim Apart What to do: Do not treat every notice as a strike. A warning is a first notice with no penalty yet, and it usually asks you to learn the policy. A Community Guidelines strike is a penalty that limits features and stays on your record. A Content ID claim is about copyright only: a rights holder may claim revenue or block a video, but it is not a strike and needs a different fix. Studio path: YouTube Studio > Content > Restrictions. Read the label on each video before you act. Example: A creator gets a warning for a misleading thumbnail, fixes the thumbnail, and keeps uploading. The same creator later gets a strike for a different video, and uploads pause. The response must match the label, not the fear. Common mistake: Appealing a Content ID claim as if it were a strike, or ignoring a strike because a claim once caused no harm. Use the fix that matches the notice you actually received.Illustrative diagram/mock-up, NOT a real YouTube Studio screenshot: warning, strike, and claim compared. Step 2: Find the Strike, Read the Rule, and Appeal in Studio What to do: Open the strike notice and read it slowly, word by word. Note the video, the date, the policy named, and the appeal option Studio shows. Appeal against that rule only. If Studio shows a deadline or window for your case, follow that window and do not guess a different one. Studio path: YouTube Studio > Content > Restrictions > click the strike > read the policy named > Appeal or Submit appeal, as shown for your case. Example: Studio names harassment for a video that mocked one person by name. The appeal quotes that rule, explains the context, and says what was edited. It does not argue about a different policy. Common mistake: Writing a general appeal that says the video was fair, without naming the rule. Reviewers need the rule, the facts, and the change, in that order.Illustrative diagram/mock-up, NOT a real YouTube Studio screenshot: where to find the appeal in Studio. Step 3: Three Strikes, Plainly: What Is Reported, and How to Confirm It What to do: Learn the reported pattern, then confirm it in your own notice. As reported in YouTube Help, a warning comes first. The first strike brings a one-week pause on uploads and related features. A second strike within 90 days brings a two-week pause. Three strikes within 90 days may lead to channel termination. Each strike expires after 90 days, as reported. Do not treat these timings as a promise for your case: check your Studio notice and the official Help page. Studio path: YouTube Studio > Content > Restrictions > click the strike > read the penalty, dates, and expiry shown for your case. Example: A creator receives a first strike on 2 May, as reported in the notice, and cannot upload for one week. The strike still counts until its expiry date, even after uploads return. Planning around the return date alone would miss the risk. Common mistake: Assuming a strike is gone because uploads are back, or assuming three strikes always mean the same outcome. Read the dates in your notice, and confirm the current wording in Help.Illustrative diagram/mock-up, NOT a real YouTube Studio screenshot: the three-strike pattern as reported. Step 4: Build Appeal Evidence That Answers the Rule What to do: Build a short, factual appeal. Quote the exact rule back in your own words, explain what the video actually shows, state any edit you made, and attach licence or context evidence. Keep the tone calm and specific. Vague appeals fail because a reviewer cannot see what changed, what was licensed, or why the decision was wrong for this video. Studio path: YouTube Studio > Content > Restrictions > strike > Appeal. Paste your evidence text in the appeal form, and add any file or link Studio asks for. Example: A tutorial used a licensed music track. The appeal names the track, gives the licence date and library, and links the licence. The reviewer can check one fact, instead of reading a long defence. Common mistake: Saying the video took hours to make, or that other channels do the same thing. Effort and comparison are not evidence about the rule named.Illustrative diagram/mock-up, NOT a real YouTube Studio screenshot: appeal evidence checks before submitting. Step 5: While You Wait: Do Not Re-upload, and Keep Records What to do: Wait for the decision without creating a second problem. Do not re-upload the same video, do not use another channel to bypass the pause, and do not delete the video to hide the strike, because deleting does not remove it. Review similar videos, fix the same risk, and check your email and Studio for the result. Studio path: YouTube Studio > Content > Restrictions, and your email inbox. Check both for the appeal result, and note the date you received it. Example: A creator waits two days, as reported for many reviews, and receives an email saying the strike stays. The creator then edits similar videos before uploading again, instead of appealing the same strike a second time. Common mistake: Sending repeated appeals, or re-uploading the video with a new title. YouTube Help says you may appeal each strike only once, and a re-upload can create a new problem.Illustrative diagram/mock-up, NOT a real YouTube Studio screenshot: what to do while you wait. Step 6: Plan the Next 90 Days and Keep a Clean Record What to do: Use the pause as a planning period. List every video with a similar risk, check titles, thumbnails, clips, and music, and fix them before the pause ends. Write a short rule for yourself for each topic you cover, and check new uploads against that rule before publishing. Studio path: YouTube Studio > Content > Restrictions to track expiry, and Content to review similar videos one by one. Example: A creator lists five videos with the same risky clip, replaces the clip in each one, and writes a note: no clip without a licence on file. Future uploads follow that note, and no second strike follows in the 90-day window. Common mistake: Returning to the same habits the day uploads return. A clean record needs a changed checklist, not only a quiet week.Illustrative diagram/mock-up, NOT a real YouTube Studio screenshot: a strike-expiry and clean-record plan. Checklist: Appeal in OrderNotice label read: warning, strike, or claim identified. Policy named, dates, and appeal window copied from Studio. Appeal written against the rule actually named, with facts. Licence or context evidence attached, where Studio asks for it. Same video not re-uploaded, and no second channel used. Similar videos reviewed, and the same risk fixed. Expiry date noted, and a clean-record checklist kept.Frequently Asked Questions Can I appeal a strike more than once? YouTube Help says you may appeal each strike only once, so make the first appeal complete. Check your Studio notice for the appeal option for your case, and do not rely on a second chance. How long does a strike appeal take? Review time is reported as usually 24 to 48 hours for many cases, but times vary. Check email and Studio, and do not send repeated appeals while you wait. Does deleting the video remove the strike? No. YouTube Help says deleting the video will not resolve the strike, and the strike remains on your channel. Fix the cause, and keep the record of what you changed. What if I think the strike is wrong, but I have no evidence? Read the exact policy again, watch the flagged part, and look for context, a licence, or an edit that changes the decision. If you still have no clear fact, do not guess: accept the warning or strike, and plan safer videos. Will one strike end my channel? Not on its own, as reported. The risk grows with repeated strikes within 90 days, so use the first strike as a warning to change the habit that caused it, and confirm your dates in Studio. Sources: Check It Yourself Official pages opened and verified live on 29 October 2026. Check the current wording before acting, because Studio options and Help wording can change.Community Guidelines strike basics on YouTube (YouTube Help) Appeal a Community Guidelines strike or video removal (YouTube Help)No official YouTube video is embedded here. No exact official video URL was verified live in this run.
- CreatorPlaybook Team
- 29 Oct, 2026
YouTube Music Copyright Strikes in India: Safe Music and How to Fix a Claim
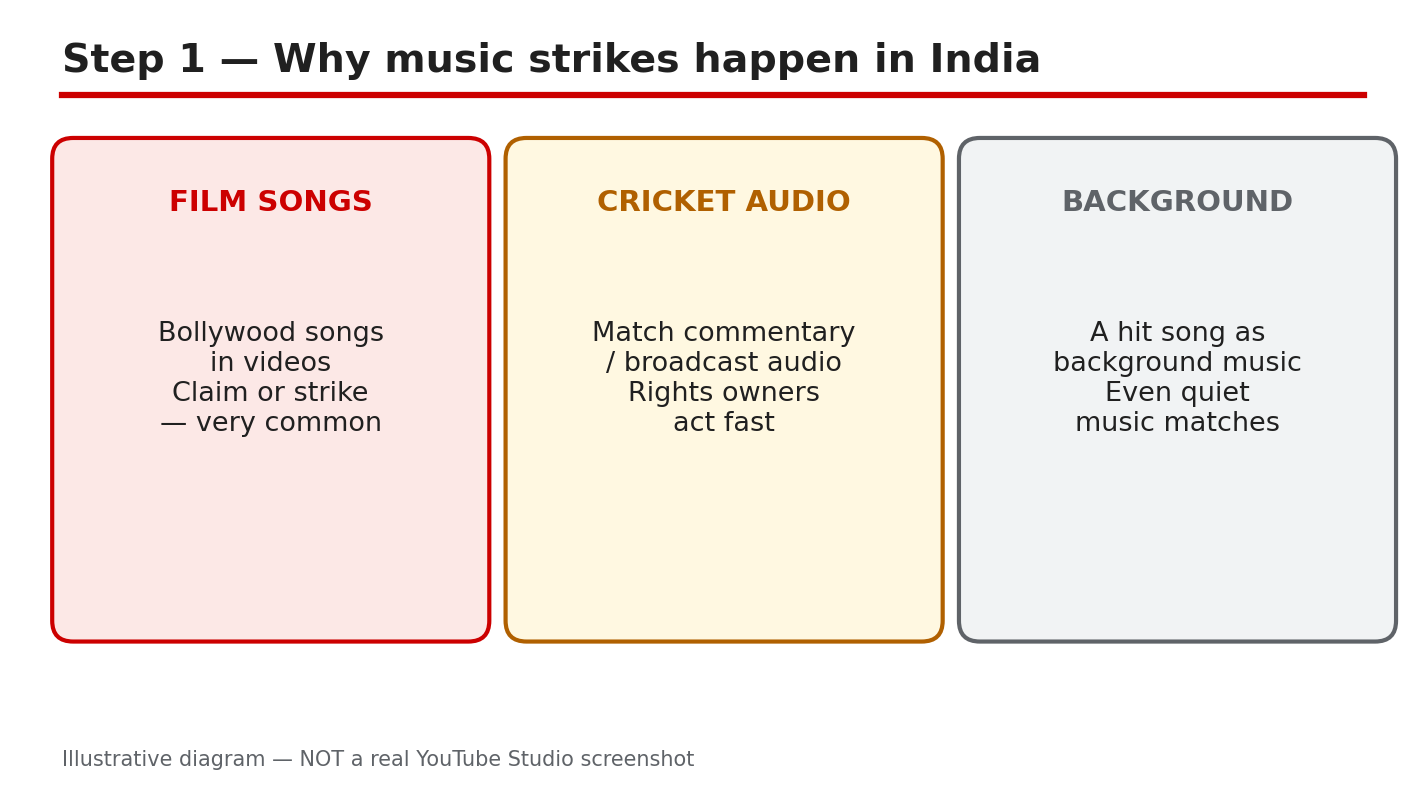
A film song playing quietly in the background can still bring a copyright claim or a strike. YouTube's matching system does not care whether the music was loud, short, or added for atmosphere. If the audio belongs to someone else, the system can find it, and the owner decides what happens next. Film songs and cricket audio are common examples in India. This guide shows you how to check a claim first, choose safe music, run four checks before you use any track, and fix a claimed video in Studio. It also explains the difference between a claim and a strike, so you do not panic over the wrong problem, and do not ignore the serious one. Check Sources for the official Help pages. What You Will LearnWhy film songs and broadcast audio are matched, even when quiet. How to read a claim in Studio, step by step. Safe music sources, and the proof to keep. Four checks to run before you use any track. How to fix a claimed video, and when to dispute.Step 1: Understand Why Strikes Happen Using a hit song, film song, or cricket broadcast audio without permission is a copyright risk, however you use it. Volume and length do not make it safe, and quiet audio can still be matched. If you did not create the music, or you do not hold a licence for it, assume you cannot use it. Decide before you edit, and check every track against Step 4 before you upload. That risk stays even if the music is only in one part of the video, or if you bought the film or the song for personal listening. Studio path: No Studio button fixes this. Decide before editing, and check every track against Step 4 before uploading. Example: A popular film song, played quietly under a travel vlog, is claimed within hours. The owner takes the revenue, and the audio must be fixed or the claim accepted. Common mistake: Crediting the singer or the film in the description is not permission.Illustrative diagram/mock-up, NOT a real Studio screenshot: why strikes happen. Step 2: Check the Claim First Do not guess, and do not delete the video at once. Open the claim and note the song name, the owner, whether it covers the whole video or only part of it, and whether Studio shows a Content ID claim or a copyright strike. Note what Studio shows first, because the right fix depends on which problem you have. Write down the details before you act, so you do not lose them while you work through the fix. Studio path: YouTube Studio > Content > Restrictions > click the claim to see the song, owner, and impact. Then return to Content to act. Example: A film song owned by a music label, with only the music claimed, can be fixed with Replace song or Erase song. It is not a strike appeal. Common mistake: Disputing at once without a licence, or deleting a video that could have been fixed.Illustrative diagram/mock-up, NOT a real Studio screenshot: check the claim first. Step 3: Choose Safe Music Sources Use the YouTube Audio Library, and check the licence terms for each track. You can also use a licensed royalty-free library, with the licence proof kept, or music you created yourself. Save proof for every track you use. A 'no copyright' label on another site is not a licence, and a song downloaded from another video is not safe music. Keep the licence with the video file name, so you can find it months later. Studio path: YouTube Studio > Audio Library in the left menu, or studio.youtube.com > Audio Library. Filter the list, then read the licence before downloading. Example: An Audio Library track allows use with attribution. Add the credit exactly as asked, save a screenshot of the terms, and then use the track. Common mistake: Treating a 'no copyright sounds' channel as a licence.Illustrative diagram/mock-up, NOT a real Studio screenshot: safe music sources. Step 4: Run the Before-Use Checks Run four checks before you use any track. First, the licence must cover YouTube, including monetized videos. Second, check whether attribution is needed, and add it exactly as asked. Third, check whether the track has caused claims for others, as far as you can check. Fourth, save the licence proof where you can find it later. If you are in doubt, choose another track. Do these checks for background music too, not only for songs that play loudly. Studio path: No Studio check replaces the licence check. Do the checks in your notes, upload, then check Studio > Content > Restrictions after processing. Example: A track that covers personal use only is skipped. Use an Audio Library track that covers YouTube instead, and save the licence page before editing. Common mistake: Checking only the price. A free download is not a free licence.Illustrative diagram/mock-up, NOT a real Studio screenshot: before-use checks. Step 5: Fix a Claimed Video Fix the video in Studio first. Use Replace song or Erase song in the video editor, then check Restrictions again after the change. Dispute only if you hold a real licence for that exact track, and you can show it. Do not dispute without proof, because a failed dispute can make the problem worse. After the fix, watch the video once to make sure the new audio fits the pictures. Studio path: YouTube Studio > Content > select the video > Editor > Audio, then Replace song or Erase song. For a dispute, go to Content > Restrictions > claim > Dispute. Example: A vlog is claimed for a film song in the middle of the video. Replace it with an Audio Library track, re-check Restrictions, and the claim is gone without deleting the video. Common mistake: Trimming only the claimed seconds and leaving the rest of the same song in the video.Illustrative diagram/mock-up, NOT a real Studio screenshot: fix a claimed video. Step 6: Build the Music-Safe Habit Keep a short list of tracks you have already checked, with the licence proof saved for each one. Use the same safe sources, check Restrictions after every upload, and fix a claim the same day. Run the checks for every new song, even if a friend recommended it. A small delay before editing is far cheaper than a strike, a lost video, or lost revenue. Share the list with anyone who edits for you, so a helper does not add a risky track. Studio path: YouTube Studio > Content > Restrictions after every upload. For a new safe track, go to YouTube Studio > Audio Library. Example: Pick a checked track, add the credit, upload, and check Restrictions. With no new claim, the video stays monetized. Common mistake: Reusing a risky song 'just for this video.'Illustrative diagram/mock-up, NOT a real Studio screenshot: the music-safe habit. Checklist: Before You Use MusicLicence covers YouTube, including monetized videos. Attribution added exactly as asked. Licence proof saved: licence, download page, and date. No film song, broadcast audio, or hit song without a licence. Restrictions checked after upload, and claims fixed the same day.Frequently Asked Questions Does quiet or short music avoid a claim? No. Matching is about the recording, not about volume or length. Quiet and short music can still be claimed. What is the difference between a claim and a strike? A claim usually affects revenue or availability for that video. A strike is a formal penalty that can restrict the channel. Check Studio to see which one you have. Can I use a song if I credit the owner? No. A credit is not a licence. You need permission or a licence that covers YouTube, and you should keep the proof. Should I dispute a claim for a film song? Only if you hold a real licence for that exact track, and you can show it. Otherwise, use Replace song or Erase song in Studio. Where can I get safe music for free? Start with the YouTube Audio Library. Check the terms for each track, save the proof, and add any attribution asked for. A Simple Rule to Remember If you cannot prove you may use the music, do not use it. Check the claim, choose a safe track, run the four checks, and fix problems in Studio the same day. Safe music keeps the video up. Keep your checked list, keep your proof, and keep the habit. One safe track, checked properly, is worth more than a hit song that brings a claim. Sources — Check It Yourself Check these sources yourself for the current wording.YouTube Help: Use music and sound effects from the Audio Library YouTube Help: Understand copyright strikes CreatorPlaybook: YouTube Copyright and Music: Safe Guide
- CreatorPlaybook Team
- 29 Oct, 2026
Can You Use Trending Audio on YouTube? How to Use Popular Sounds Legally
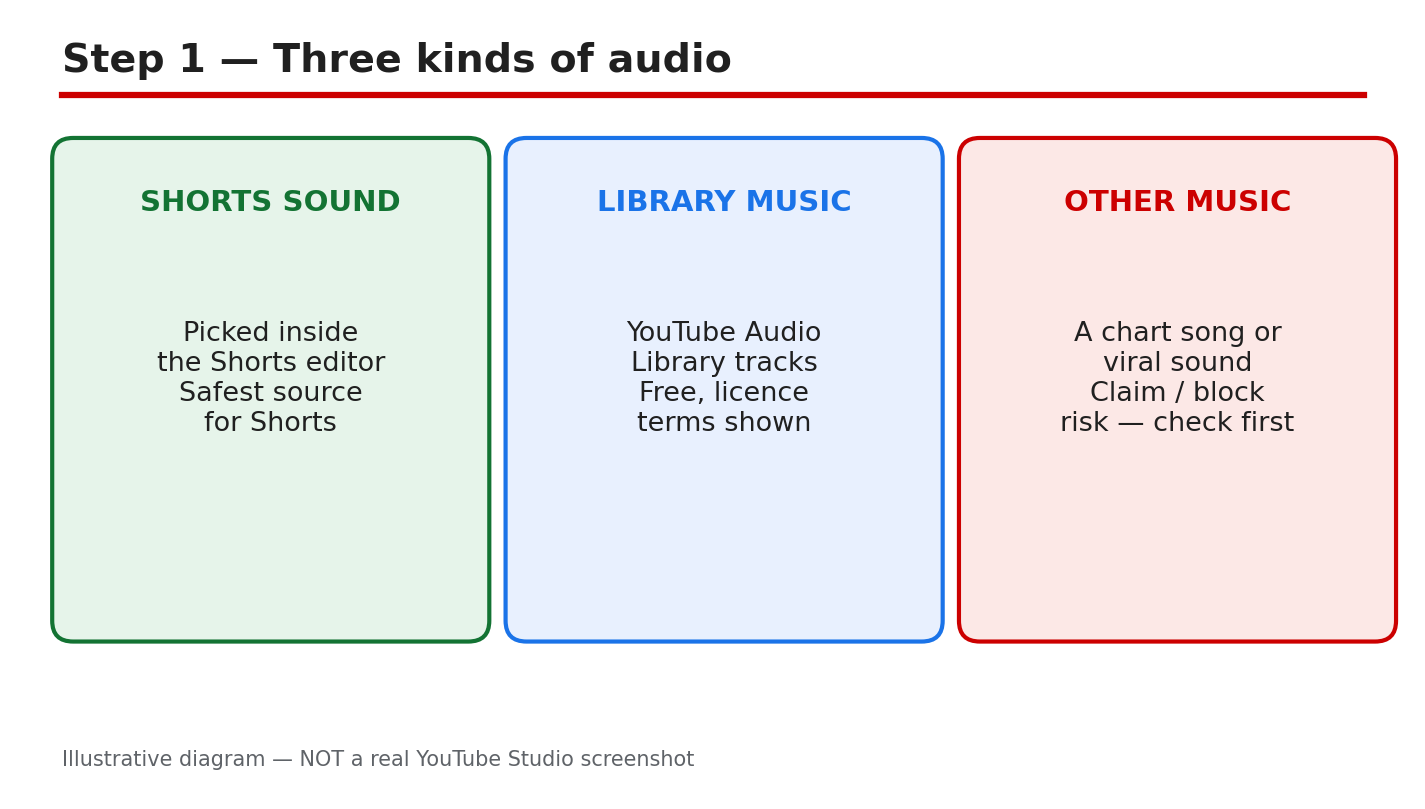
A trending sound can make a Short take off, but the wrong audio can also bring a copyright claim, a muted video, or lost earnings. The sound itself is rarely the problem. The problem is where it came from, and whether you had a right to use that exact recording. This guide keeps the choice simple. Use audio from a source you can check, check it before you publish, and know what to do if a claim still arrives. Do not trust a comment that says a few seconds is always safe. What You Will LearnThe three audio sources on YouTube, and which one is safest for a Short. How to check a video in YouTube Studio before you publish it. What Content ID actually matches, and why short clips are not safe. Four checks to run on any sound you did not pick inside Shorts. What to do if a claim arrives, including when not to dispute it.Related reading: YouTube Copyright and Music: Safe Guide for CreatorsDiagram: three kinds of audio — a Shorts sound, an Audio Library track, and other music. This is an illustrative diagram and mock-up, not a real YouTube Studio screenshot. Step 1: Know the Three Audio Sources Start by naming where your sound came from. There are three common sources. First, a sound picked inside the Shorts editor, using the sound picker for Shorts. Second, a track from the YouTube Audio Library, where the licence terms are shown for each track. Third, any other music: a chart song, a viral sound, or a track from another app or website. The source decides how much checking you must do. Example: You add a dance sound from the Shorts sound picker to a 20-second Short. That is the lowest-risk route in this guide, because the sound was offered inside Shorts for Shorts. Common mistake: Downloading a chart song from another site and adding it to a Short, then assuming it is safe because it is popular. Popularity is not permission, and a claim can still follow.Diagram: the check-before-you-publish path in Studio, ending with the Audio Library licence terms. This is an illustrative diagram and mock-up, not a real YouTube Studio screenshot. Step 2: Check Before You Publish Do this check while the video is still a draft, not after it is public. Open YouTube Studio, then go to Content in the left menu, then look at the Restrictions column for your video. If a copyright claim is shown there, read what it says before you publish. Then, for any Audio Library track, open the track and read its licence terms, including whether attribution is required. Exact path: YouTube Studio > Content > Restrictions column > Audio Library licence terms. Example: A draft Short shows "Copyright claim" in Restrictions. You replace the song before publishing, instead of learning about the claim from a viewer comment a week later. Common mistake: Publishing first and checking later. Once a video is public, a claim can affect it while you are still deciding what to do.Diagram: Content ID matches the exact recording, not the melody, and credit does not remove a claim. This is an illustrative diagram and mock-up, not a real YouTube Studio screenshot. Step 3: Understand What Content ID Matches Content ID compares your video against reference recordings supplied by rights owners. It matches the exact recording, not just a melody, a cover, or a similar beat. There is no safe number of seconds. A very short clip can still match, and a longer clip does not become safe by being edited, sped up, or quieter. Adding credit in the description does not remove a claim. Credit can be polite, and it can be required by a licence, but it is not permission by itself. If the rights owner did not allow the use, a credit line will not change the match. Example: You use four seconds of a chart song as an intro and add the artist's name in the description. The clip can still be matched, because the recording, not the length or the credit, is what is checked. Common mistake: Believing that "a few seconds is safe." That idea is wrong, and it is the most expensive shortcut in this guide. Treat every second of someone else's recording as a possible match.Diagram: four safe-audio checks — source, licence, Restrictions, and territory. This is an illustrative diagram and mock-up, not a real YouTube Studio screenshot. Step 4: Run the Four Safe-Audio Checks Run these four checks on any sound you did not pick inside Shorts. First, source: can you name where the track came from, and does that source allow YouTube use? Second, licence and attribution: read the licence terms and add any required credit exactly as asked. Third, Restrictions: is the Restrictions column clear in Studio? Fourth, territory: is the video blocked in any country, and does that matter for your audience? Example: An Audio Library track requires the artist's name in the description. You paste the credit before publishing, and you keep a screenshot of the licence terms for your records. Common mistake: Checking only the first item, the source, and skipping the licence terms. A free track can still need attribution, and a missing credit can still cause trouble.Diagram: if a claim arrives, replace or erase the song, and dispute only with evidence. This is an illustrative diagram and mock-up, not a real YouTube Studio screenshot. Step 5: If a Claim Arrives, Fix It in Studio Open the claim in YouTube Studio and read it first. Note who claimed the audio, what was matched, and what the claim affects. In Studio, you can use Replace song to swap the audio for a track from the Audio Library, or Erase song to remove the claimed audio. Dispute a claim only if you own the rights or have clear permission, and you can show evidence. A dispute is a formal statement, not a message asking for a favour. If you do not have evidence, fix the audio instead and move on. Example: A claim names a song in the last ten seconds of a vlog. You use Replace song, check Restrictions again, and publish the fix without changing the rest of the video. Common mistake: Disputing every claim at once, including claims on music you know you do not own. A weak dispute wastes time and can damage your standing.Diagram: the safe-audio habit — pick, check, publish, and re-check. This is an illustrative diagram and mock-up, not a real YouTube Studio screenshot. Step 6: Build the Safe-Audio Habit Make the safe route the easy route. Keep a short list of sounds you have already checked, and reuse them. When you try a new sound, run the four checks before you edit around it. Check Restrictions before every publish, even for a Short you made in a hurry. The habit takes minutes, and it is what keeps a channel free of repeat claims. Example: Before a weekly Short, you open your checked-sounds list, pick one sound, and publish without a last-minute search for a trending song. Common mistake: Treating this guide as a one-time fix. Audio rules and claims change, and a sound that was fine last year may not be fine now. Re-check each time. Quick ChecklistSource named: Shorts picker, Audio Library, or other music. Restrictions column checked in Studio before publishing. Audio Library licence terms read, including attribution. No "few seconds is safe" assumption used. Territory blocks checked, if they matter for your audience. Claim read in full before any action is taken. Replace song or Erase song used before disputing. Checked-sounds list updated for the next video.Frequently Asked Questions Can I use a trending sound on YouTube? Yes, if the sound comes from a source that allows it, such as the Shorts sound picker or the Audio Library under its licence terms. A trending chart song from another site is the risky case: check it in Studio first, and expect a possible claim. Is five seconds of a song safe? No. There is no safe number of seconds, and Content ID can match a very short clip. Do not rely on a seconds rule; check the source and the Restrictions column instead. Does adding credit in the description remove a claim? No. Credit does not remove a claim, and it is not permission by itself. Add credit when a licence asks for it, but still check the source and Restrictions first. What should I do if a claim arrives? Read the claim in Studio, then use Replace song or Erase song to fix the audio. Dispute only if you own the rights or have clear permission and can show evidence. Sources — Check It Yourself Check the official pages below for the current rules, and re-check them before you rely on them, because YouTube's help pages change. No official YouTube video was embedded in this post: no exact official video was verified live in this run, so none is shown here. YouTube Help: Use music and sound effects from the Audio Library YouTube Help: How Content ID works
- CreatorPlaybook Team
- 29 Oct, 2026
YouTube Copyright Claim? How to Trim, Replace or Erase the Song — and When to Dispute
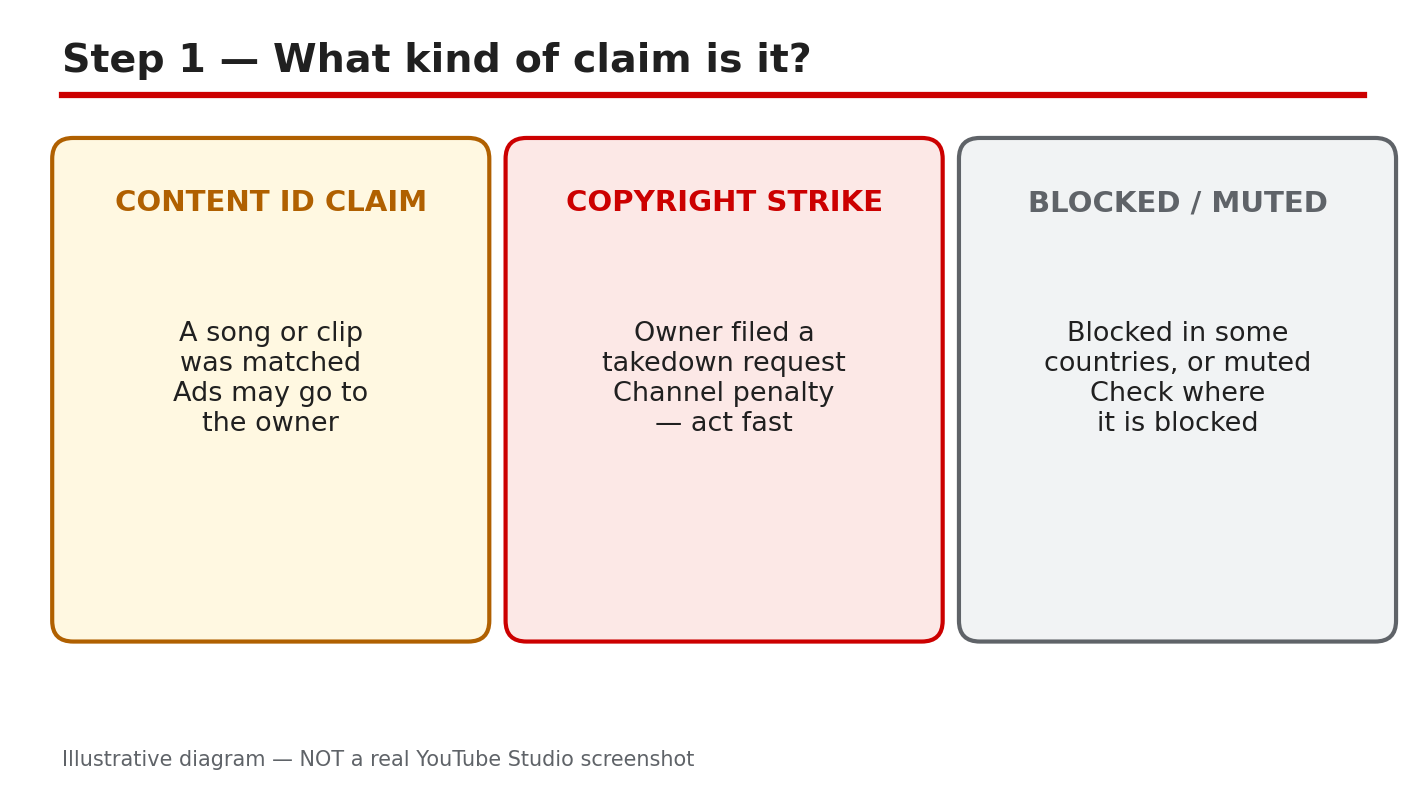
A copyright claim on a video you worked hard on can feel like a punishment, even when you did nothing dishonest. In most cases it is not. A Content ID claim usually means YouTube matched part of your video, often a song, to material a rights holder has registered, and the rights holder chose what happens next. The video may stay up, it may be blocked in some places, or its advertising revenue may go to the claimant. Your first job is not to panic, dispute, or delete. Your first job is to read the claim exactly as Studio shows it, because the right fix depends on what was claimed, where, and for how long. This guide walks through the checks and fixes in YouTube Studio in order. You will learn how to tell a claim from a strike, how to see the exact work, claimant, and territory, how the three Studio fixes differ, what to gather before you dispute, and how to choose between disputing, fixing, or leaving the claim alone. Read Studio's warning on the edit screen before you save any change. This is general information, not legal advice. If a dispute could affect important income or a channel you depend on, consider professional advice. Related reading: How to Protect Your Channel from Strikes, Copyright and Reused Content. What You Will LearnHow to tell a Content ID claim, a copyright strike, and a blocked or muted video apart. How to find the exact claimed work, claimant, and territory in Studio. What Trim out segment, Replace song, and Erase song each do, and what each costs. What evidence you need before a dispute is honest and safe to file. When to dispute, when to fix in Studio, and when to leave a claim alone. A calm seven-day plan for checking, deciding, and fixing one claimed video.Step 1: Identify the Claim Type What to do: Before you touch the video, name the problem correctly. A Content ID claim, a copyright removal request that creates a strike, and a restriction such as a block or mute are different systems, with different consequences. YouTube says copyright claims are different from copyright strikes and usually do not impact your channel or account, while a strike comes from a formal takedown request and is more serious. A claim can block, monetize, or track a video, and any of those actions can be geography-specific, so a video can be monetized in one country and blocked in another. Do not treat every notice as a strike, and do not treat a strike as a minor claim. Studio path: YouTube Studio > Content > Restrictions column. Hover over the entry for the video and read whether it says Claims, Copyright - Takedown, or another restriction. Click See details only after you have noted the label. Example: A tutorial shows "Claims" in Restrictions, plays normally for you, but earns no revenue for you. That is most likely a Content ID claim, not a strike. Common mistake: Deleting the video in a panic. Deletion removes your watch time and comments, and it does not teach you what caused the claim, so the next video can repeat it.Illustrative diagram/mock-up comparing claim types. This is NOT a real YouTube Studio screenshot. Step 2: Read the Exact Claim Details What to do: Open the claim details and write down four facts before you decide anything: the exact work named, who claimed it, what action applies, and where it applies. A claim can cover only a short segment, and different claimants can claim different segments or different countries. You may also have more than one claim on one video. If you do not know the claimant, do not assume the claim is invalid. YouTube notes that a claimant you do not recognize may be a collecting society or another authorized representative, so an unfamiliar name alone is not proof of error. Studio path: YouTube Studio > Content > Restrictions > click the claim > See details > Content used > See details. Read the Claimant, the content used, the policy, and the territory or territories shown. Example: The details name a 22-second song segment from 1:04 to 1:26, claimed by a music publisher, with a monetize policy in most countries and a block in two countries. The rest of the video is not claimed. Common mistake: Reading only the email subject or the first line in Studio. The email tells you a claim exists; only the details tell you whether a short trim will clear it or whether the whole audio track is involved.Illustrative diagram/mock-up of the five-step path to see a claim in Studio. This is NOT a real YouTube Studio screenshot. Step 3: Compare Trim, Replace, and Erase What to do: Once you know the claimed segment, compare the three Studio fixes by what they remove and what they leave behind. Trim out segment edits out just the claimed segment from your video, so both picture and sound in that part go. Replace song swaps claimed audio for other audio from the YouTube Audio Library, so the picture stays and new music plays instead. Erase song mutes the claimed audio; you can erase just the song, keeping dialogue and sound effects where possible, or mute all sound in the claimed segments. If done successfully, any of these options will automatically clear a copyright claim. Preview every edit before you save, and check that no claimed audio or picture remains, because a partial fix will not clear the claim. Studio path: YouTube Studio > Content > click the notice on the video > View details > find the relevant claim > Take Action > Trim out segment, Replace song, or Erase song. Then preview, adjust the start and end times if offered, and click Save, then confirm Trim, Save, or Mute as Studio asks. Example: A 22-second claimed song plays over a talking-head explanation. Trim would cut the explanation too, so Replace song is better: the explanation stays, with a quiet Audio Library track underneath, and the claim can clear. Common mistake: Choosing Erase song for a video where the song and the voice are mixed together, then discovering the voice is hard to hear. Preview with headphones, and use Mute all sound in the claimed segments only when losing all sound there is acceptable.Illustrative diagram/mock-up comparing Trim out segment, Replace song, and Erase song. This is NOT a real YouTube Studio screenshot. Step 4: Gather Evidence Before You Dispute What to do: A dispute is a statement that you have a right to use the material, or that the claim is wrong. Do not file one because you are annoyed, because the song is short, or because you gave credit. Credit alone does not replace permission. Gather real evidence first: your licence or written permission, with the track name, licensor, dates, and territory; proof that the work is yours, such as project files or an original recording; or a clear, specific fair-use explanation, such as commentary, criticism, or teaching that transforms the material, with timestamps showing what you added. Save screenshots and emails in one folder, and note the exact claim you are disputing. If you cannot point to ownership, a licence, or genuine fair-use grounds, do not dispute yet. Studio path: YouTube Studio > Content > Restrictions > See details > Content used > See details. Keep this page open while you check your licence file, so the work, claimant, and segment you are checking match the evidence in your hand. Example: A creator finds a licence email for a track, dated before publication, covering YouTube worldwide. That is evidence worth attaching or quoting accurately in a dispute. A screenshot of a download page with no licence terms is not. Common mistake: Disputing with "I found it on the internet" or "everyone uses it." Those are not grounds, and a weak dispute can waste time and damage your credibility with the claimant and with YouTube.Illustrative diagram/mock-up of the four questions to check before disputing a claim. This is NOT a real YouTube Studio screenshot. Step 5: Decide — Dispute, Fix, or Leave It What to do: Use a simple decision rule. Dispute only when you have genuine grounds and evidence from Step 4, and you can state them accurately. Fix in Studio when the claimed material is not essential, when a trim, replacement, or erase will leave a video you are still proud to publish, or when the claim blocks viewers you care about. Leave the claim and move on when the video stays viewable where your audience is, the revenue at stake is small, and a fix would damage the video more than the claim does. Leaving a claim is not ignoring it: note the claimant, segment, and decision, and change the music or clip source for your next video. Whatever you choose, read Studio's warning on the edit screen before saving. YouTube Help states that, starting in June 2025, once you save your edited video, you will not be able to revert the changes, and that as of June 2025 you are not able to undo changes made with the YouTube Studio Editor after saving. Keep a copy of the original video before you edit, if you may need it later. Studio path: YouTube Studio > Content > Restrictions > See details. For a fix, continue to Take Action > Trim out segment, Replace song, or Erase song > Preview > Save and confirm. For a dispute, use the dispute option shown for that claim, and enter only grounds and evidence you can support. Example: A creator with a licence disputes a song claim and keeps the video intact. The same creator leaves a different claim alone on an old video with 40 views, because replacing its music would take longer than the video is worth. Common mistake: Saving a Studio edit before previewing it, then finding the trim cut a key sentence. Preview first, because the saved edit cannot be reverted in Studio Editor.Illustrative diagram/mock-up comparing dispute, fix, and leave-it choices for a claim. This is NOT a real YouTube Studio screenshot. Step 6: Follow a Seven-Day Fix Plan What to do: Give the claim a short, dated plan so it does not drift. Day 1: record the claim type, work, claimant, segment, policy, and territory from Step 2. Day 2: check licences, permissions, and project files, and decide whether a dispute has genuine grounds. Day 3: choose dispute, fix, or leave, using Step 5, and write down why. Day 4: if fixing, preview the trim, replacement, or erase in Studio, and save a copy of the original first. Day 5: save the chosen fix, then wait for processing to finish; do not make other edits while the video is processing. Day 6: reload Studio, confirm the claim is gone or changed, and play the edited segment. Day 7: fix the cause for future videos, such as switching music libraries, shortening borrowed clips, or adding real commentary, and file your notes and licences together. Studio path: YouTube Studio > Content > Restrictions for the daily check; then Content > the video > View details > Take Action for the fix; then Content > Restrictions again on Day 6 to confirm the result. Example: On Day 4 a creator previews a replacement track, notices it starts too loudly, lowers it, previews again, and only then saves. On Day 6 the claim is gone and the explanation is intact. Common mistake: Making a second edit while the first is still processing, or judging the result before processing finishes. Wait, reload, and check the edited segment itself.Illustrative diagram/mock-up of the seven-day fix plan for a claim. This is NOT a real YouTube Studio screenshot. Checklist: Before You Save or DisputeClaim type named: Content ID claim, takedown, or another restriction. Exact work, claimant, segment times, policy, and territory written down. Fix compared: trim, replace, or erase, with the preview watched. Dispute evidence ready, or a clear decision not to dispute. Studio warning read, original video copied, and no other edit in progress. Result re-checked after processing, and the cause fixed for future videos.Frequently Asked Questions Does a copyright claim give my channel a strike? Not by itself. YouTube says copyright claims are different from copyright strikes and usually do not impact your channel or account. A strike follows a formal copyright removal request, which is a different process, so read the Restrictions label carefully. Can I use a song if I only use a few seconds? Short does not mean safe. Content ID can match a short segment, and a licence or genuine fair-use ground matters more than length. If you have no licence, replace the music or keep the segment out. Will trimming, replacing, or erasing always clear the claim? If done successfully, YouTube says any of these options will automatically clear a copyright claim. If claimed material remains, the claim will not clear, so preview the whole claimed segment and re-check after processing. Should I dispute if I gave credit to the owner? No, not on credit alone. Credit does not replace permission or a licence. Dispute only with ownership, a licence, or another genuine ground, with evidence you can show. Can I undo a Studio edit after I save it? YouTube Help states that, starting in June 2025, once you save your edited video, you will not be able to revert the changes, and you cannot undo Studio Editor changes after saving. Preview carefully and keep a copy of the original before you save. Sources — Check It Yourself These official YouTube Help pages were opened and verified live while this guide was prepared. Check the current wording in Studio and in these pages before you act, because policies and Studio screens can change.Learn about copyright claims — YouTube Help Remove copyright-claimed content from videos — YouTube HelpNo official YouTube video is embedded in this post. No exact official video URL was verified live during preparation, so none was embedded rather than guessing one. This guide is general information, not legal advice.

- CreatorPlaybook Team
- 25 Oct, 2026
How to Protect Your Channel from Strikes, Copyright and Reused Content
A single strike can limit a channel, and repeated strikes can remove it, yet many strikes are avoidable with simple habits: using licensed or original material, checking claims before publishing, and adding real value to anything you reuse. Copyright, community guidelines, and reused-content rules are different systems, but they share one idea: YouTube protects viewers, creators, and rights holders, and it expects creators to make original work that follows the rules. This guide explains how to protect your channel from strikes, copyright problems, and reused-content issues, in plain language. It covers the difference between claims and strikes, how to use music, clips, and images safely, how to transform reused material with original commentary, how to check your channel status, and what to do if you receive a claim or strike. This is general information, not legal advice; for a serious dispute, check YouTube's official help pages and consider professional advice. Related guides: YouTube Copyright and Music: Safe Guide, Monetization Beyond AdSense: Affiliate, Sponsorship, Membership, and How to Read and Use the YouTube Studio App. Official source: Understand copyright strikes What You Will LearnThe difference between claims, strikes, and reused-content issues How to use music, clips, and images safely How to add original value to reused material How to check your channel status regularly How to avoid community-guidelines strikes What to do if you get a claim or strikeStep 1: Learn the Difference Between Claims and Strikes What to do: Learn that a Content ID claim and a copyright strike are not the same. A claim usually means a rights holder has identified their material in your video, and the video may be monetized by them, blocked in some regions, or left alone, but it is not a strike. A strike comes from a formal takedown request, and it is more serious: it can limit features, and multiple strikes can lead to channel termination. Community-guidelines strikes are separate, and come from breaking YouTube's rules on content, not from copyright alone. How to do it in simple steps:Check YouTube Studio for claims, strikes, and restrictions, separately. Read the details of each claim: what material, and what action was taken. Do not panic over a claim, but do not ignore a strike. Learn the current strike rules in YouTube's official help pages.Practical example: A creator gets a claim on a song used in a tutorial, and the video's revenue goes to the rights holder, but the channel is not struck. The creator switches to licensed music for future videos, and the problem does not repeat. Common mistake to avoid: Treating every claim as a strike, or treating a strike as a minor claim. Ignoring a strike, or repeating the same mistake that caused it, is how small problems become channel-ending problems. Illustrative image: Claims and strikes are different, and need different responses. This is an illustrative image, not a screenshot of your channel or another creator's work. Step 2: Use Music, Clips, and Images Only With a Right to Use Them What to do: Use only music, clips, and images you have a right to use: your own work, properly licensed music, royalty-free libraries with clear terms, or material you have permission for. For music, check whether a track is licensed for YouTube, whether it needs attribution, and whether it can be used for monetized videos. For clips and images, check the licence, not just whether you found them online. Finding something online does not mean you may reuse it. How to do it in simple steps:Keep a list of music and image sources, with their licence terms. Check music licences before publishing, not after a claim. Save licences and permissions, in case you need to show them later. When in doubt, replace the material with your own or licensed work.Practical example: A creator replaces a popular song with a licensed track from a music library, and a tutorial that previously received claims now publishes cleanly, with no revenue loss and no strike risk. Common mistake to avoid: Using a popular song, movie clip, or photo because "everyone uses it," or because it is short. Length does not make reuse legal, and popularity does not grant permission. Illustrative image: Use only material you have a right to use, and keep the licence. This is an illustrative image, not a screenshot of your channel or another creator's work. Step 3: Add Real Original Value to Anything You Reuse What to do: If you reuse other material, add real original value: your own commentary, teaching, criticism, or transformation, so the video is not simply someone else's work re-uploaded. Reused content, such as compilations, clips without commentary, or minimally edited videos, can be flagged for monetization and policy reasons, even without a copyright strike. The test is whether a viewer gets something new from your video, beyond what the original already offered. How to do it in simple steps:Ask: what does my video add that the original does not? Add your own voice, explanation, examples, and structure. Use short clips to support a point, not as the whole video. Credit sources where appropriate, without assuming credit replaces permission.Practical example: A creator reacts to a news clip by pausing, explaining the background, showing examples, and teaching a skill related to it. The video is original teaching that uses a clip, not a re-upload of the clip itself. Common mistake to avoid: Uploading a compilation, a reaction with no commentary, or a video that is mostly someone else's footage, and calling it original because you added an intro. Minimal changes do not make reused content original. Illustrative image: Add teaching and commentary, not just a re-upload. This is an illustrative image, not a screenshot of your channel or another creator's work. Step 4: Check Your Channel Status and Copyright Notices Regularly What to do: Check your channel status, copyright notices, and restrictions regularly, in YouTube Studio, so you catch problems early. A weekly check takes minutes and can prevent a small issue from becoming a strike: you can remove, replace, or dispute material, update music, or edit a video before a pattern forms. Keep a simple log of claims, actions taken, and licences used, so you can see patterns and avoid repeating mistakes. How to do it in simple steps:Check copyright and community-guidelines status weekly. Review each new claim, and note what material caused it. Fix the cause for future videos, not only for the claimed video. Keep licences, permissions, and dispute records in one place.Practical example: A creator checks Studio weekly, notices two claims from the same music source, and switches libraries before a third video is affected. The channel stays clean, because the pattern was caught early. Common mistake to avoid: Never checking Studio until a strike arrives, or checking only views and subscribers. Channel health is as important as growth, and it needs regular attention. Illustrative image: A weekly channel-health check catches problems early. This is an illustrative image, not a screenshot of your channel or another creator's work. Step 5: Avoid Community-Guidelines Strikes With Clear Rules for Yourself What to do: Avoid community-guidelines strikes by setting clear rules for yourself: no misleading titles or thumbnails, no harmful or deceptive content, no spam, and no content that breaks YouTube's policies on safety, harassment, or misinformation. Read the guidelines for your topic, especially if you cover health, finance, news, or sensitive subjects, where rules are stricter. When a topic is borderline, choose a safer angle, or do not publish it. How to do it in simple steps:Read the community guidelines for your main topics. Check titles and thumbnails for misleading claims. Avoid deceptive practices, such as fake giveaways or spam. When unsure, choose a clearer, safer version of the video.Practical example: A creator changes a thumbnail that promised a result the video did not deliver, to an honest thumbnail showing the actual setup. Views are slightly lower, but the channel avoids a misleading-content strike and keeps viewer trust. Common mistake to avoid: Using clickbait, misleading thumbnails, or controversial claims to chase views, and then being surprised by a strike. Short-term views are not worth long-term channel risk. Illustrative image: Honest titles and safe content protect your channel. This is an illustrative image, not a screenshot of your channel or another creator's work. Step 6: Respond Calmly and Correctly to a Claim or Strike What to do: If you receive a claim or strike, respond calmly and correctly: read the notice fully, check what material is involved, and choose the right response, which may be to accept it, replace the material, trim the video, or dispute it only if you have a valid reason, such as a licence or fair use. Do not dispute a valid claim, do not re-upload a removed video, and do not repeat the same mistake in the next video. Keep records of your response, and learn from the notice. How to do it in simple steps:Read the full notice, including the material and the action. Check your licences and permissions for that material. Choose the correct action: accept, replace, trim, or dispute with evidence. Fix the cause for future videos, and keep a record.Practical example: A creator receives a claim for a music track, replaces it with a licensed track, and the claim is resolved. The creator also updates their music list, so the same track is never used again. Common mistake to avoid: Disputing every claim without evidence, re-uploading a removed video, or ignoring a strike. These actions can worsen the situation and lead to further strikes. Illustrative image: Read the notice, check your licence, and act correctly. This is an illustrative image, not a screenshot of your channel or another creator's work. Checklist to Protect Your ChannelClaims, strikes, and restrictions checked weekly Music, clips, and images used only with a right to use them Licences and permissions saved Original commentary added to any reused material Honest titles and thumbnails, with no misleading claims Community guidelines read for your topics Claim or strike response planned, with records keptFrequently Asked Questions Can I use a short clip of a song or movie? Short does not mean safe. Use licensed music, or a clip only where you have a right or a valid fair-use reason, and check YouTube's official guidance. When in doubt, replace it. Does giving credit protect me from copyright? No. Credit does not replace permission or a licence, although it is good practice where required. You still need a right to use the material. What happens if I get three strikes? Rules can change, but historically, multiple strikes can lead to channel termination. Check YouTube's current strike policy in its official help pages, and treat any strike seriously. Can I dispute a claim? Yes, if you have a valid reason, such as a licence, permission, or fair use, and evidence to support it. Do not dispute a claim you know is valid, as a false dispute can cause further problems. Is reused content always bad? No, but it must add original value. Compilations, clips, and reactions without commentary are risky, while teaching, criticism, and transformation with your own work are much safer. Protecting your channel is not about fear, but about habits: licensed material, original value, regular checks, and honest content. Those habits keep your channel safe, and they also make your videos better for viewers.
- CreatorPlaybook Team
- 25 Oct, 2026
YouTube Copyright and Music: Safe Guide
Copyright and music cause more confusion, and more claims, than almost any other topic for new creators. The safe approach is simple: use only music and clips you have a clear right to use, understand what a claim means, and keep records. This guide explains YouTube copyright and music in plain language, without legal jargon, so you can publish with confidence. Related guides: How to Edit Videos in CapCut for Beginners, Voiceover Tips for Clear Audio, and How to Script a YouTube Video. Official source: Use music and sound effects from the Audio Library What You Will LearnWhat copyright means for a YouTube video How to choose music that is safe to use What Content ID claims, strikes, and disputes mean How to use short clips and fair use safely How to check a video before publishing What to do if you receive a claim or strikeStep 1: Use Only Music You Have a Clear Right to Use What to do: Start from licensed music: YouTube's Audio Library, a subscription music library, or music you created or commissioned. If you cannot show where the music came from and what licence it has, do not use it. How to do it in simple steps:Browse the YouTube Audio Library and filter by mood, genre, and licence. Check whether attribution is required, and add it to the description if so. Keep the licence, receipt, or download record for every paid track. Avoid popular songs unless you have a written licence for YouTube use.Practical example: A creator uses a free track from the Audio Library that requires attribution, and adds the artist's name to the description. The video stays monetised, with no claim, because the licence terms were followed. Common mistake to avoid: Using a popular song because "everyone does it" or because you bought it on a music store. Buying a song for listening does not give you the right to use it in a video. Illustrative image: Use music with a clear licence, not just a song you like. This is an illustrative image, not a screenshot of your channel or another creator's work. Step 2: Understand Claims, Strikes, and Takedowns What to do: Learn the difference between a Content ID claim, a copyright strike, and a takedown. They sound similar, but they have very different consequences. How to do it in simple steps:A Content ID claim usually means the rights holder may monetise your video or restrict it; it is not automatically a strike. A copyright strike is more serious and can lead to channel restrictions if you receive several. Read every notice carefully: it tells you what content was matched and who claimed it. Do not ignore strikes; act within the time given in the notice.Practical example: A creator receives a claim for background music in one video. The video stays up, but ad revenue goes to the rights holder. Replacing the track with licensed music avoids the same problem next time. Common mistake to avoid: Assuming a claim means your channel is about to be deleted, or ignoring it completely. Most claims are resolved by replacing music, removing a clip, or disputing with evidence. Illustrative image: Read every copyright notice: claim, strike, and takedown mean different things. This is an illustrative image, not a screenshot of your channel or another creator's work. Step 3: Be Careful With Short Clips and Fair Use What to do: If you use other people's clips, keep them short, purposeful, and transformed by your commentary. Fair use is a legal defence, not a guarantee, and YouTube's automated system may still claim a video. How to do it in simple steps:Use only the part of a clip needed to make your point. Add your own commentary, criticism, or teaching over or around it. Do not use a clip as a substitute for the original work. Credit the source, but remember credit alone does not make use legal.Practical example: A creator shows a 10-second clip while explaining what makes its editing work, with commentary throughout. That is far safer than playing a full song or scene with no added value. Common mistake to avoid: Believing that "under 30 seconds," "with credit," or "for educational purposes" automatically makes any use safe. No single rule guarantees fair use. Illustrative image: Short, commented clips are safer than long, unedited ones. This is an illustrative image, not a screenshot of your channel or another creator's work. Step 4: Check Music and Clips Before You Publish What to do: Check your video for copyright issues before it goes public, using YouTube's checks during upload. Fixing a problem before publishing is much easier than after viewers have watched it. How to do it in simple steps:Upload as unlisted or private first, if you want to check carefully. Read the copyright checks shown during upload. If a track is flagged, replace it, trim it, or mute that section. Keep a list of safe tracks you have used successfully before.Practical example: A creator uploads a tutorial, sees a music claim during checks, swaps the track for an Audio Library alternative, and publishes with no claim. The extra five minutes saved weeks of dispute. Common mistake to avoid: Publishing immediately and hoping no one notices. Automated detection notices most popular music quickly, even on small channels. Illustrative image: Check for copyright issues before publishing, not after. This is an illustrative image, not a screenshot of your channel or another creator's work. Step 5: Keep Records for Every Track and Clip What to do: Keep a simple record for each video: music source, licence, and any permission you received. Records make disputes faster and calmer. How to do it in simple steps:Note the track name, library, and licence in a spreadsheet or document. Save receipts, licence emails, and attribution notes. For commissioned music, keep the written agreement. If a claim arrives, check your record before disputing.Practical example: A creator receives a claim for a licensed track, finds the licence receipt in two minutes, and disputes successfully with that evidence. Without the record, the dispute would have been guesswork. Common mistake to avoid: Relying on memory for licences. Six months later, you will not remember which track came from which library, or what its terms were. Illustrative image: A simple licence record makes disputes much easier. This is an illustrative image, not a screenshot of your channel or another creator's work. Step 6: Respond Calmly to Claims and Strikes What to do: If you receive a claim or strike, read it, decide on the facts, and choose the simplest safe action: accept, replace, remove, or dispute with evidence. How to do it in simple steps:Read the notice and identify the exact content matched. If you have no right to use it, replace or remove that section. If you have a licence, dispute with the licence details. Learn from the outcome and update your safe-music list.Practical example: A creator disputes a claim with a subscription library licence, and the claim is released. They then add that library to their trusted list and avoid the same issue. Common mistake to avoid: Disputing every claim without evidence, or disputing with anger. False disputes can lead to strikes, so dispute only when your record supports you. Illustrative image: Respond with evidence and a calm, factual dispute when you have a licence. This is an illustrative image, not a screenshot of your channel or another creator's work. Checklist for Safe Copyright and MusicMusic from a licensed library, with terms checked Attribution added where required Licences and receipts saved Clips short, purposeful, and commented on Copyright checks reviewed before publishing Claims handled by replacing, removing, or disputing with evidenceFrequently Asked Questions Can I use any song if I give credit? No. Credit does not replace a licence. You still need permission or a licence that covers YouTube use. Is music from the YouTube Audio Library always safe? It is safe when you follow its licence terms, including attribution if required, and use it on YouTube as intended. What happens if I get a Content ID claim? Usually, the rights holder may monetise the video or restrict it in some regions. It is not the same as a strike, but you should still fix the issue. Can I dispute a claim? Yes, if you have a licence or a fair-use basis. Provide clear evidence, and only dispute when your record supports you. Should I avoid music altogether? No. Music adds mood and energy, and licensed music is easy to find. The safe path is licensed music, not silence. This guide is general information, not legal advice. For complex cases, check YouTube's official help pages or seek professional advice. For most creators, licensed music, short purposeful clips, and good records keep publishing safe.